
Introduction
Workshop Synopsis:
This tutorial has been designed for a two-part full-day series of workshops at the University of Kent, which will provide students with an introduction to the Processing computer language. The first day you will be introduced to core programming terminologies, by coding basic programs, or sketches as they are referred to within Processing, demonstrating how programs are comprised of ‘syntax’, ‘functions’ and ‘data’ with a focus on how to draw 2D shapes. The first workshop will provide a foundation to move onto more advanced programming concepts.
In the second workshop we will move towards three dimensions and learn how to make previously inanimate objects on a screen, interact with one another, act on individual rules and group behaviours, thus developing autonomous agents which can produce emergent ‘architectural’ forms. We will also briefly cover interaction with external data sources.
What is Processing?
Processing is considered by many to be a flexible software sketchbook and language, targeted towards the electronic arts and visual design communities, purpose built for teaching non-programmers the fundamentals of computer programming in a visual context. However, Processing is not in fact a programming language but rather a library which extends and simplifies the Java language which Processing is built on top of.
Processing simplifies the processes of starting to code by removing some of the complexities of setting up a development environment which exist with traditional programming languages and tools. It accomplishes this by providing a ready-to-program integrated development environment (IDE) which has Java included.
Lets get a little more familiar with the Processing IDE:
The Processing 3.4 IDE showing a comparison between the stock white theme and the Moria Dark theme made by Jeremy Paton.
Why learn Processing?
A good question, especially if you are an architecture student with little to no programming experience.
Traditionally architecture degree-courses have not embraced programming as a methodology towards design. However, we are seeing a shift to introduce more complex 3D modelling tools such as Rhino into undergraduate courses, where as before such tools have been limited to postgraduate. Along with Rhino and Revit come parametric modelling tools such as Grasshopper and Dynamo which provide an alternative to syntax (typed) programming in the form of a visual programming language. However, these tools are often highly complex and not particularly intuitive (despite their visual programming method) and fail to communicate the fundamental principles which are need to ‘code’ ones own program.
Processing provides a good middle ground, simple enough for students to begin learning yet, requires students to learn the basics firsts and extensible allowing development of highly complex projects. This is important as not everything can be accomplished with the native tools or plugins for Grasshopper and you may need to code your own bespoke competent.
However, Processing should not be considered an all-inclusive alternative to tools such as Grasshopper. Processing provides a platform for architects to explore topics such as; generative design, emergence, self-organisation or evolutionary systems, problems which often require computation to explore and can be used exclusivity or in tandem with tools such as Grasshopper.
Further more, this exploration is derived from an ongoing history of ideas within post-modern thought which found precedents in mathematics and computer science,
such as Cellular Automata, swarms, reaction diffusion systems and evolutionary algorithms. Such an approach to design provides an advantageous paradigm for architecture as it supplants the top-down explicit design methodology in favour of a bottom-up architecture which is the emergent outcome of a whole lot of interconnected feedback loops.[¹]
Another consideration is future academic studies, such as completing a MSc in Architectural Computation or Bio-Integrated Design. Having experience with coding will greatly aid in such an endeavour.
Projects using Processing:
Emergent Form Finding Application + Structural Optimisation
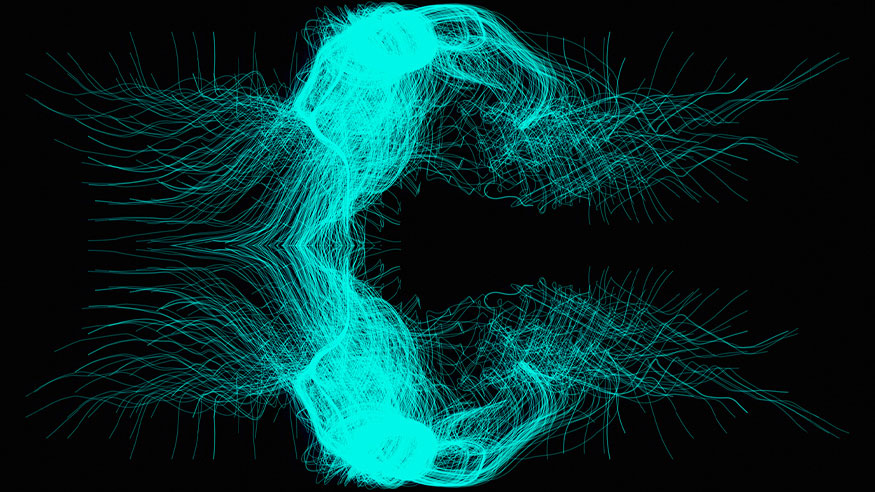
Stage 4 Project, Unit 4, MArch Kent, By Jeremy Paton
Data mining & visualisation northern lights photography in Iceland
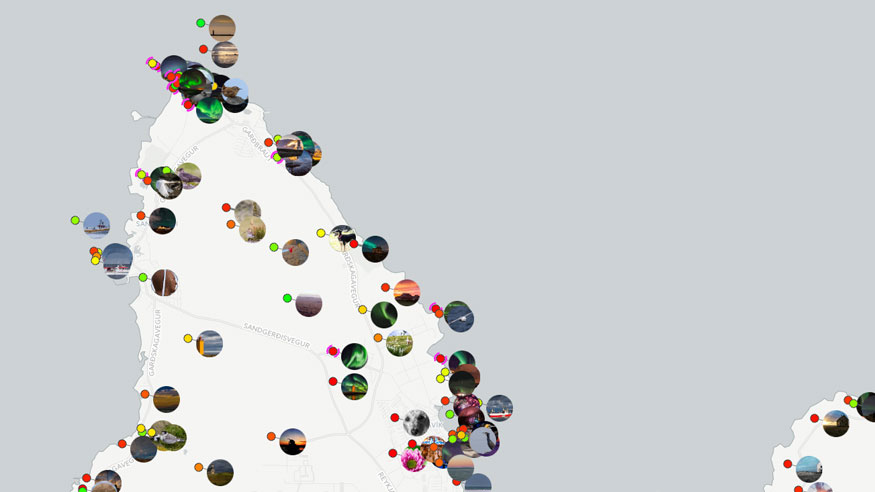
Stage 4 Project, Unit 4, MArch Kent, By Jeremy Paton
SpaceWires by Filamentrics
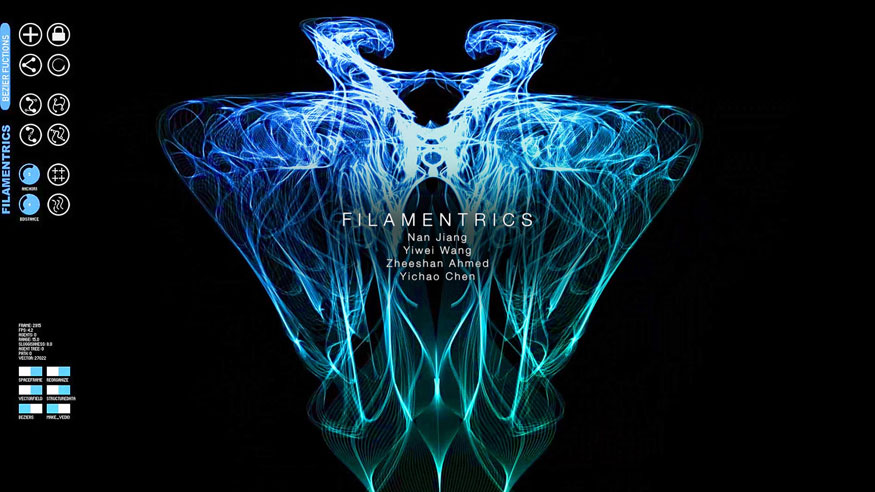
Bartlett BPro GAD/RC4, Team Filamentrics: Zeeshan Ahmed, Justin Yichao Chen, Nan Jiang,Yiwei Wang

1. Lines, Points & Shapes
The beginning… as good a place to start as any. Lesson one will start by introducing you to the syntax (notation) of Processing, and inherently a slimmed down version of the Java programming language. However, the core concepts covered in these exercises apply to almost all programming languages. We will start with a simple exercise to draw a line on the screen, this may seem trivial however, from here we can progress onto shapes, boxes, images, trees and a host of complex 3D forms.
Patience is key, getting to grips with the basics is essential before you can produce more complex sketches in Processing. Spend as much time as you can familiarising yourself with the syntax and built in functions of processing. A fantastic resource for this can be found at the Processing References page: https://processing.org/reference/
Key programming concepts:
Functions, data, parameters, types, declaration, assignment
1.1 Introduction
Essentially any Processing sketch is comprised of two elements: functions and data. At this point functions refer to the built in functions provided by Processing such as: line(x1, y1, x2, y2) or point(x, y) and by Java such as: loop() later we will see how to build our own functions. Most Processing sketches will be comprised of numerous functions. Often a function will do some of the work for us, such as producing some 2D/3D geometry, a cube or sphere. Followed by another function which rotates the object and a third which is used to draw the object to the canvas. Data refers to the information we provide (or pass) to a function, in the case of line(0, 0, 50, 50) we are providing the function with four required parameters (0,0,50,50) which tells the function the coordinates to begin drawing the line from and where the line ends. In this case we are providing a pair of coordinates. The StartX and StartY position {0,0} followed by the EndX and EndY position {50,50} . Almost all functions will require you to pass some number of parameters in order for the function to know what to do. In some cases a function will also return data.
1.2 Sketching using functions
Lets put into practise what we have learnt by coding our first Processing sketch. Type the following into the Processing IDE:
// This program draws a line
// Lines that begin with '//' are 'comments'
// Comments are ignored by the computer, however they help others (and you!) understand what the code does.

line(0,0,50,50);
Notice how the call to the function is structured: you write the function name ‘line‘ followed by an open bracket ‘(‘, then list the required parameters separated by commas, then add a close bracket ‘)’. Finally you declare the end of the line by adding a semicolon ‘;’.
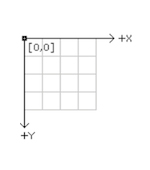
1.3 2D Cartesian plane
Its important to quickly cover Processing’s 2D coordinate system. Whilst Processing is set to 2D rendering, the upper-left corner has the coordinate {0,0} and the lower-right coordinate {width,height}. Thus if we have a canvas with the size of 200 width by 100 height, the lower-right coordinate will be {200,100}. The X and Y are increasing positively to the right and down respectively. See the following image to help visualise this:
1.4 Overriding The Canvas Size
As we can see in the sketch we’ve created the size of the window (canvas) was quite small and we have no influence over this. Lets change that by overriding the default size of the canvas. There is no set rule for what size the canvas should be, this will be determined by the nature of your sketch, sometimes a landscape (16:9) resolution works best or setting the canvas to full-screen (covered later!). For now lets set the canvas size to (200×200), in order to do this we need to call another function, to instruct the computer to set the new size of the canvas. The function to change the canvas size is called ‘size’ and requires two parameters, a width and height.
size(200,200);
line(0,0,50,50);
Notice how the sketch is starting to turn into a sort of recipe of functions. Starting with setting the canvas size to {200,200} followed by drawing a line from {0,0} to {50,50}.
1.5 Order Of Operations
Note that the order of these functions is very important. Programming operates in a linear fashion. To demonstrate this lets change the background colour of the sketch. To do this we need to use the function ‘background’, as follows:
size(200,200);
line(0,0,50,50);
background(175);
You should now have encountered your fist bug. The canvas is now pure white and the line has disappeared. See if you can solve this error your self based on the previous note about order of operations.
1.6 Drawing Other Shapes
We are not only limited to drawing lines, we can also draw shapes. Processing includes some built in functions which allow us to draw rectangles, and ellipses. Lets add a rectangle to the canvas above the the line. The rectangle function requires four parameters: rect(a, b, c, d) the pairs (a, b) determine the coordinate where the top left corner of the rectangle will be drawn and (c, d) determine the width and height of the rectangle. Thus rect(10, 10, 30, 30) will results in a square which a top corner at the coordinate {10,10} and a width and height of {30,30}. See the bellow sketch and try reproducing it:
For variation we can add an ellipse to this sketch, which we can place over the rectangle, so it appears within the rectangle. The ‘ellipse‘ function also requires four parameters, which operate in the same manner as the four parameters for the ‘rect‘ function. The ‘ellipse‘ function is called as follows: ellipse(a, b, c, d).
However, after adding an ellipse(10, 10, 30, 30) to the sketch you should notice that the position of the ellipse is being drawn based on its centre, unlike how the rectangle is drawn from its top-right corner. This can be changed by using another function, which we need to include before the ‘ellipse’ function, this function can be called as follows: ellipseMode(CORNER) See if you can reproduce the sketch bellow:
ellipseMode(CORNER) has multiple options including: ‘CENTER’, ‘RADIUS’ and ‘CORNERS’. How these change the method by which an ellipse is drawn can be read at the Processing reference page.
You can also change the method by which a rectangle is drawn by using: rectMode(CENTER) which has multiple options including: ‘CORNERS’, ‘RADIUS’ and ‘CORNER’. How these change the method by which a rectangle is drawn can be read at the Processing reference page.
1.7 Drawing Points
Lastly we can add two points to the sketch, one at the centre of the ellipse, placed above the line, rectangle and ellipse and another at the end of the line.
Whilst Processing is in 2D mode, a point has no defined size and will be drawn as a single pixel. As discussed in section 1.4 Overriding The Canvas Size we adjusted the canvas size to (200×200) this indicates that the canvas has exactly 200 pixels to the right (width) and 200 pixels downwards (height). The point function can be called as follows: point(x, y) and requires a simple x and y coordinates as its parameters. In order to draw two points, you will need to call the ‘point‘ function twice, one after the other. See the sketch bellow and try to reproduce it, without looking at the code:
size(200,200);              // Set the canvas size to 200px by 200px
background(175);            // Set the background colour to grey (175)
line(0,0,50,50);            // Draw a line from {0,0} to {50,50}
rect(10,10,30,30);          // Draw a rectangle at {10,10} with a width of 30px and a height of 30px
ellipseMode(CORNER);        // Set the ellipse draw mode to draw from the upper-left corner of the ellipse
ellipse(10,10,30,30);       // Draw an ellipse at {10,10} with a width of 30px and a height of 30px
point(25,25);               // Draw a point at {25,25}
point(55,55);               // Draw a point at {55,55}
1.8 Advanced Data: Variables
Lets consider the following objective: to draw a row of ten boxes next to one another. A possible solution would be to call the rect(a, b, c, d) function 10 times to create such a row, however, this would involve unnecessary duplication. A fundamental part of learning to program is to learn to write short, efficient sketches (without code duplication) that can generate sets of geometry rather than tediously adding geometry a single line at a time. The first stage on the road to reducing duplication is to introduce placeholders called variables.
A variable is simply some know or unknown data (value) which you have associated to a symbolic-name (an identifier). Its advisable to give our data a name which is representative of what kind of data it stores, often when referring to coordinate data we will simply assign the x-coordinate with ‘x’ and the y-coordinate with ‘y’. This is advisable as the more complex your project becomes the more challenging it will be to keep track of what each variable represents. Try keeping variable names short and succinct!
Many programming languages require you to tell the computer what type of data our variable will contain, such data-types (variable types) include, but are not limited to the following:
int a = 1;                      // Used to store integer (whole) numbers
float b = 1.123456;             // Used to store floating point (decimal) numbers
String c = "Some Text Here";    // Used to store text and requires double ""
char d = 'd';                   // Used to store a single character and requires single ''
boolean e = true;               // Used to store two special values: true or false (1 or 0)
As you can see above the type of the variable is written before the name of the variable, in most cases the type is all lower case with the exception of ‘String‘ which starts with a capital, as ‘String‘ is in fact a ‘Class‘ rather than a primitive type like ‘boolean‘. ‘String‘ has methods that can be called directly to it (like the famous ‘length()‘, ‘replace()‘ and ‘split()‘). None of the primitive types have these functions. Have a look on the Processing Reference page for more Primitive Data types and more Composite (Class) Data types.
Note that there is only space for a single number in each integer variable, therefore a variable cannot contain the number ‘2’ and ‘5’. However, it is possible to change the value which a variable stores, hence the name variable, the value is not considered static. This makes variables incredibly useful to stand in for real numbers when we do something repetitively. For example, where we want to draw our 10 boxes in row. If we have a variable to designate the position, we can simply alter the variable, to change the boxes position, without altering the ‘rect‘ function.
In order to achieve this we need to designate the position of the box using a variable. Lets use ‘x’ as the name of our variable and assign it the value 10. Next we need to pass our new variable ‘x’ into the ‘rect‘ function, in place of one of the parameters. In this case it is the first parameter which defines the x-coordinate of the ‘rect‘ function, as follows:
int x;              // Declare our variable name and assign it as an integer type
x = 10;             // Assign the value which our variable stores
rect(x,0,5,5);      // Draw a rectangle and pass our variable as the first parameter
The above code will result in a canvas with a 5px by 5px rectangle with its top left corner at the coordinate {x,0}. Since ‘x’ is set to 10 at the beginning of the sketch, the box is drawn with its top corner at {10,0}.
Now, try removing the line x = 10; and re-run the sketch. Processing will object to this and output an error in the console:
The local variable “x” may not have been initialized.
You will also notice that the ‘rect‘ function ‘x’ is underlined with red zig-zag. This indicates that Processing has no knowledge of what the value for ‘x’ should be. Effectively the integer variable ‘x’ is undefined and has no associated integer value. Processing can therefore not draw the box as it would be drawing the x-coordinate of the box to an undefined location. Fortunately, Processing is able to pick up the error in our code and present us with an error, which helps us to see which line the error occurred on and possibly what needs to be done to fix the error.
Rather than replacing the line, lets condense Line 1 and Line 2 in the above code into a single line, by declaring and assigning the variable in the same line.
int x = 10;         // Declare the variable name and assign it as an integer type and assign it a value of 10
rect(x,0,5,5);      // Draw a rectangle and pass our variable as the first parameter
1.9 Basic Operations
Before we can complete our objective in the above section 1.8 Advanced Data: Variables, to produce a row of boxes, we need to learn one more core feature of Processing: how to manipulate the values of variables. We will look at two methods to draw two boxes, firstly without a variable, and secondly, with a variable:
// v1 - Without a variable
rect(0,0,5,5);
rect(10,0,5,5);
The problem with the above code is that for each and every box we wish to draw, we need to write a new call to the function ‘rect‘. With a variable, the code would look as such:
// v2 - With a Variable
int x = 0;
rect(x,0,5,5);
x = 10;
rect(x,0,5,5);
At first the above code my look cumbersome as we have to reassign the variable value at Line 4 and we have increased the amount of code need to produce the same end result. However, we should start to see a pattern forming within the code, and this will be an essential point, which we will take advantage of when we come to draw out 10 boxes in a row as we learn about looping through code in the next section. For now lets investigate another method to change the variable, up till now we have simply assigned a variable with a static value. However, it is possible to perform an operation, for example, like so:
// v3 - With a Variable and Operation
int x = 0;
rect(x,0,5,5);
x = x + 10;
rect(x,0,5,5);
The above code performs an identical function to the last two examples. This tends to be an ongoing recurrence within programming as often there is more than a single solution to a problem. However, which is the better method will often depend on the context of what we are trying to accomplish, nevertheless, keep in mind that most of the time the goal is to produce succinct code, if you find you are duplicating code this may indicate that there is a better solution.
Though the above code achieves the same outcome as before, it does this in a slightly different manner. Rather than reassigning the variable ‘x’ with 10, this code reassigns the value of ‘x’ plus 10. Note the addition is performed first. ‘x’, currently 0, is added to 10, giving a result of 10. The addition is technically known as an operation, and the plus sign ‘+‘, is known as an operator. Other operators we encounter soon are ‘−‘ (subtraction), ‘*‘ (multiply), ‘/‘ (divide) and ‘%‘ (modulo, or remainder after division). Note that ‘*‘ is used rather that ‘ב as there is no dedicated multiplication symbol on the keyboard.
We could alternatively use multiplication to achieve the same outcome as the previous example by making some basic alterations to the the code as follows:
// v4 - With a Variable and Multiplication Operation
int x = 0;
rect(x*10,0,5,5);
x = x + 1;
rect(x*10,0,5,5);
Once again the result is the same, however, this time ‘x’ is assigned the value ‘0’, and then the value of ‘x’ plus ‘1’ (0 + 1). Each time when we call the ‘rect‘ function we multiply ‘x’ by 10, therefore the first time the box is drawn at 0 * 10 or 0 across, and the second time at 1 * 10 or 10 across.
In our quest to write the most concise code possible we can change the above code to use some shorthand methods for adding values within Processing, as this is something we often do in programming. The following lines all do the same thing:
// Addition shorthand
x = x + 1;
x += 1;
x++;
Each line above adds 1 to the existing value of ‘x’.
We are now in a position to progress to loops, to repeat the same piece of code with a set of different values for a variable. However, before we move on its probably important to quickly revise using operators such as ‘+‘. ‘*‘ and ‘/‘, but also especially the two short hand methods we have introduced: ‘+=‘ and ‘++‘ as well as you may have guest the inverse versions of these shorthand operators: ‘-=‘ and ‘—‘. For example, you might write a more advanced script, something like:
int x = 0;
int y = 1;
rect(x*10, y*10,5,5);  // x = 0 and y = 10
x = x + 3;             // x = 3
rect(x*10, y*10,5,5);  // x = 30 and y = 10
y += 5;                // y = 6
rect(x*10, y*10,5,5);  // x = 30 and y = 60
x--;                   // x = 2
rect(x*10, y*10,5,5);  // x = 20 and y = 60
2. Loops, Conditions And Variation
Lesson two is a direct continuation from lesson one, specifically our goal in section 1.9 Basic Operations to achieve a row of 10 boxes. In order to achieve this, lesson two will introduce you to the programming concept of repetition (also known as loops). Within the lesson we will also attempt to generate some simple artworks by using the basic primitives of lines and rectangles combined and altered through the use of loops and conditions, which will create variation.
Key programming concepts:
Iteration, conditional statements, comparison operators, logical operators
2.1 Introduction
Thus far we’ve been not been able to do very much, only producing some arbitrary lines and rectangles on the canvas. How can we create try to imitate the diversity found in the natural world, within our own virtual environment? One answer is through the use of repetition, diversity and detail, and for these we can use loops, conditions and recursion.
A loop repeats many times. It may be used to generate many similar shapes. Or it might be used to iterate through many shapes to find the one you want to alter.
A conditional statement, by contrast, creates diversity. It changes the programs flow so that in one case, say one iteration of the loop, we might follow one path and create a box, and another iteration we might follow another path and create a sphere. Or we may use a condition to test which mouse button has been pressed, or which direction the mouse is moving, and respond accordingly. Think of conditional statements as gates which can be opened or shut if specific criteria are met.
2.2 Loops
Within Processing there are two types of loops, ‘for‘ loops and ‘while‘ loops. ‘For‘ loops are the more ubiquitous of the two, as they can, for the most part, achieve everything a ‘while‘ loop can achieve. The basic structure is as follows, the word ‘for‘ followed by some specific information about how many times to loop (or iterate) enclosed between rounded brackets ‘(‘ and ‘)‘ – think of these as parameters, yet slightly different. Then followed by the section of code that you want to repeat enclosed between squiggly brackets (braces) ‘{‘ and ‘}‘. Here is an example of a ‘for‘ loop:
for (int i = 0; i < 10; i++) {
  println(i);
}
Run this code and take a look at the console, you should see a list of numbers from (0 – 9).
Now lets examine the syntax (structure) of the ‘for‘ loop to determine how it printed these 10 numbers. Take a look at Line 1, specifically (int i = 0; i < 10; i++). This line is essentially comprised of three parts, all of which we’ve seen previously, but, now combined within a single function. Lets dissect each part:
int i = 0;      // Variable declaration and assignment: tells the loop to start counting from 0
i < 10;         // Conditional statement: tells the loop it should continue while i is less than 10
i++             // Each iteration of the loop will increase i by 1
If we walk through the ‘for‘ loop. the loop is set to start counting from 0, using the variable ‘i‘ to store the count value. The loop will now execute the code which is written between the ‘{‘ and ‘}‘. When the last line of the code is completed the loop will increase the count value ‘i‘ by 1, as it’s been set to by ‘i++‘. This process will be repeated until the count value ‘i‘ is 9, as when ‘i‘ reaches 10 it will not pass our conditional statement set by ‘i < 10‘, terminating the ‘for‘ loop. Thus the code contained within the ‘{‘ and ‘}‘ will occur a total of 10 times.
In the above example we used a built in function within Processing to print a line of text to the console, this is completed by: println(i);. The ‘println‘ (print line) function is highly useful for debugging your program, and like other functions it requires a parameter to be passed for the function to know what ‘data‘ it should print to the console. In the case of our simple ‘for‘ loop we are printing the value contained by the loops count variable ‘i‘. Each time the loop occurs the value of ‘i‘ is printed, which is being incremented by 1 each iteration, therefore, the numbers 0,1,2,3….9 are printed.
A few points to point out. Firstly, it is common practise to reserve the variable ‘i‘ for ‘for‘ loops. Secondly it is common practise to start counting from 0 in almost all programming languages, this becomes more important later on, but for now one reason for this is that if we take a passing glance at the line: for (int i = 0; i < 10; i++) we can quickly read that this code will occur a total of 10 times.
To demonstrate the linear nature by which code is read and how the loop affects this, we can add in two lines of code to the previous example:
println("--BEGIN--");
for (int i = 0; i < 10; i++) {
  println(i);
}
println("--END--");
Which should output the following:
--BEGIN--
0
1
2
3
4
5
6
7
8
9
--END--
We see now that the sketch starts by printing out “–BEGIN–“, then loops through ten times, printing the values of the counter (0 – 9), and finally prints out “–END–“.
One last note to make regards the parameters we can pass to the ‘println‘ function, notice how the function distinguishes between variables, such has ‘i‘ and constants such as “–BEGIN–“. The variable ‘i‘ is written without quotation marks, which indicates to Processing that we are referring to a variable which it needs to look up the value of. In the case of “–BEGIN–” we want Processing to print out the literal text (string) “–BEGIN–” and “–END–“. Thus we enclose the text within double quotations, as was shown in section 1.8 Advanced Data: Variables when declaring and assigning a value to a variable type ‘String‘. We can combine a constant and variable within the ‘println‘ function as follows:
println("--BEGIN--");
for (int i = 0; i < 10; i++) {
  println("Loop Number: "+i);
}
println("--END--");
2.3 A Row Of Rectangles
We are now finally ready to achieve our goal of a row of 10 boxes. This will kick off our exploration of adding interest to our sketches through repetition, then moving towards variation and then finally some simply artworks. Bellow is the code which combines everything we’ve learnt thus far to achieve a row of 10 boxes and avoids the unnecessary repetition of code:
for (int i = 0; i < 10; i++) {      // Loop 10 times, with an increment of 1
  rect(i*10, 0, 5, 5);              // Draw a rectangle at {i*10,0} with a width and height of 5px
}
Notice that the variable is not limited to simply the location of the boxes, yet can also be used to set the height of the boxes, or alternatively their width. An example could look as such:
for (int i = 0; i < 10; i++) {      // Loop 10 times, with an increment of 1
  rect(i*10, 0, 5, 50-i*5);         // Draw a rectangle at {i*10,0} with a width of 5px and height of 50px - i*5
}
Before we proceed its important you understand why this sketch does what it does. In particular, that 50-i*5 produces a box which is 50 pixels high only when ‘i‘ is 0, therefore the first iteration of the loop. And the final box will be 5px high as: 50-9*5 = 5. Don’t forget the last iteration of the loop ‘i‘ will be equal to 9 not 10.
2.4 Coloured lines and rectangles
Its possible to make our output look slightly prettier by changing the colour of the rectangles progressively. Firstly, let us introduce three new functions: ‘background‘, ‘stroke‘ and ‘fill‘. Below is an example which implements all three of these functions:
background(39,40,34);               // Set the background colour for the canvas
stroke(255);                        // Set the outline (stroke) colour
fill(125);                          // Set the internal (fill) colour
for (int i = 0; i < 10; i++) {      // Loop 10 times, with an increment of 1
  rect(i*10, 0, 5, 50-i*5);         // Draw a rectangle at {i*10,0} with a width of 5px and height of 50px - i*5
}
Lets quickly go over the colour parameters which these three functions require. On line 1 we see that the ‘background‘ function has been provided three parameters, whereas on lines 2 and 3 the functions ‘stroke‘ and ‘fill‘ have only a single parameter. What is the reason for this? If you open the ‘colour selector‘ in Processing (Tools > Color Selector) a new window will open, showing a colour pallet and a set of values on the right, if you are familiar with Photoshop you will most likely have seen something like this before. Now to answer the previous question, all functions in Processing which accept a colour parameter can accept a single value which will define ‘grey‘ or monotones between the range of 0 and 255, where 0 is black and 255 is white. Hence the white outlines of our rectangles which we set to 255. However, if you want to display a colour you will need to provide the RGB values for that specific colour, see bellow for examples:
background(0);            // Black background
background(255);          // White background
background(255,0,0);      // Red background
background(0,255,0);      // Green background
background(0,0,255);      // Blue background
background(165,25,240);   // Purple background
Try adapting the example above to use some other colours. Using the Processing colour selector will help you to determine the RGB value for a specific colour.
Now lets make the colours of our boxes a little more dynamic, by moving the ‘fill‘ function from outside (before) the loop which draws the 10 boxes, to within the loop. Furthermore, the ‘fill‘ function’s parameters also accept a variable like the ‘rect‘ function. Thus we can adjust the fill for the ten boxes to show gradation in grey-scales as so:
background(39,40,34);               // Set the background colour for the canvas
stroke(255);                        // Set the outline (stroke) colour
for (int i = 0; i < 10; i++) {      // Loop 10 times, with an increment of 1
  fill(i*25);                       // Set the internal (fill) colour to i*25
  rect(i*10, 0, 5, 50-i*5);         // Draw a rectangle at {i*10,0} with a width of 5px and height of 50px - i*5
}
Variable Scopes: Try moving Line 4 fill(i*25); to before the loop. You should notice that Processing now outputs an error:
The variable “i” does not exist.
The reason for this is due to what is known as Variable Scopes, in the case of our variable ‘i‘ it can only ever be referred to within the braces ‘{‘ and ‘}‘ of the for loop. This is because we declared the variable ‘i‘ within the construction of our for loop: int i = 0
2.5 Nested Loops
Now, rather than just a single row, perhaps we may desire a grid. One solution for creating ‘n‘ number of rows would be by nesting one loop inside of anther loop, this would created what is referred to as a nested loop. Lets take a look at the code to create such a grid:
size(200,200);
background(39,40,34);               // Set the background colour for the canvas
stroke(255);                        // Set the outline (stroke) colour
noFill();                           // Set the fill colour to none (transparent)
int scale = 10;
for (int y = 0; y < height; y+=scale) {      // Outer Loop: Y - Rows
  for (int x = 0; x < width; x+=scale) {     // Inner Loop: X - Cols
    rect(x,y,scale,scale);                   // Draw a box at {x,y} with the size (scale)
  }
}
The above example presents a noticeable jump in the complexity of our code, thus lets analyse what we are telling Processing to do. Firstly on line 5 we declare a new variable called ‘scale‘ this variable will be used for two purposes, firstly it’s used to set the increment used within the loops and secondly its used to set the size of the rectangle, try adjusting the value of ‘scale‘ and running the sketch. On lines 6 and 7 you now see two ‘for‘ loops, we can consider the first loop (outer) our row position or ‘y‘ value and the second loop (inner) our column position or ‘x‘ value. On the first iteration of the first loop the second loop will be run until its counter ‘x‘ is less than the value of the width of the canvas (x < width), and so on until the outer loop meets its condition (y < height). This can be expressed more easily as follows:
for every row               // y value
↑   for every column        // x value
    ↑   draw a rectangle
And if we take a look at the values of ‘x‘ and ‘y‘ we can see the following happen:
y = 0
    x = 0
    x = 10
    x = 20
    .
    .
    x = 180
    x = 190
y = 10
    x = 0
    x = 10
    x = 20
    .
    .
    x = 180
    x = 190
... and so on until y = 190
And at each stage (iteration) of the inner loop we call the ‘rect‘ function to draw a rectangle, see line 8. If you look at line 4 you will notice we have called a new function called ‘noFill‘ this is a special function which requires no parameters and servers the opposite function of the ‘fill‘ function, by removing any fill colour, making any geometry called after this function to have a transparent fill. We also use the ‘scale‘ variable to set the width and height parameters of our rectangle. Try adjusting line 8 to the following: rect(x,y,scale/2,scale/2);
Its possible that instead of using the the ‘noFill‘ function we can fill each rectangle that comprises the grid with a unique colour. In order to do this we need to remove the ‘noFill‘ function and as was shown in section 2.4 Coloured Lines And Rectangles include the ‘fill‘ function within the loop, we will use the variable values of ‘x‘ and ‘y‘ and operators to alter the fill colour of our rectangle for each iteration of our nested loop, as follows:
size(200,200);
background(39,40,34);               // Set the background colour for the canvas
stroke(255);                        // Set the outline (stroke) colour
int scale = 10;
for (int y = 0; y < height; y+=scale) {      // Outer Loop: Y - Rows
  for (int x = 0; x < width; x+=scale) {     // Inner Loop: X - Cols
    fill(y, 255 - x, y + x);                 // Fill using operations
    rect(x,y,scale,scale);                   // Draw a box at {x,y} with the size (scale)
  }
}
Have a go at altering this code, for example we could remove the white grid lines. To do this replace ‘line 3‘ with: noStroke();, this function works exactly like ‘noFill‘ however, instead of removing the fill colour, it will remove the stroke (border) line around each rectangle.
2.7 If Statements
Whilst repetition a is a powerful tool, which saves us time, the outputs can become a bit repetitive. Whilst we are starting to get more varied and charming outputs from our program, the general pattern is very regular. Regardless how we manipulate ‘i‘, be it through an operation such as ‘i * i + 10‘ or simply ‘i‘, it still follows a predictable pattern. Therefore, how do we add irregularity? An answer to this is through the use of conditional statements such as an ‘if‘ statement. Indeed, even if what we want to do is to follow some rules for the generation of a form, we will still need to specify the conditions for them to be obeyed, and this involves using ‘if‘.
To demonstrate a simple usage of the ‘if‘ statement lets draw a grid of rectangles with a single row and single column highlighted in colour. I’ve simplified the previous code to show how we might go about solving this challenge:
for (int y = 0; y < 10; y++) {       // Outer Loop: Y - Rows
  for (int x = 0; x < 10; x++) {     // Inner Loop: X - Cols
    if (y == 3) {                    // Check if the y value is equal to 3
      fill(128, 64, 255);            // Fill using a purple colour
    }
    rect(x*10,y*10,5,5);             // Draw a box at {x plus 10,y plus 10} with the size 5px by 5px
  }
}
The above code, still makes use of our nested loop to create a grid of rectangles, however, instead of increasing by a variable we increment ‘y‘ and ‘x‘ by 1, until each reaches 9. This will create a grid of 10 by 10 rectangles.
Notice on line 3 we’ve included an ‘if‘ statement. They syntax for an ‘if‘ statement is similar to that of a ‘for‘ loop. It begins with the keyword ‘if‘ and is followed by a condition which is between rounded brackets. Finally, it has the code to execute, if the condition is true, between braces ‘{‘ and ‘}‘. If the condition is not true, then Processing skips the code between the braces, and continues as per normal. In the above case we are saying if ‘y‘ is equal to 3, then perform the action(s) between the braces, else ignore them.
Furthermore, notice that the condition uses a double equals sign (==). This is to distinguish the comparison operation (“is ‘y’ equal to 3″) from the assignment operation (“set ‘y’ equal to 3″).
Now lets look at what our coding is actually doing: it draws three rows in the original colour (white) and then the remaining rows in a (purple) colour. However, we asked Processing when ‘y‘ is equal to 3 set the colour to purple, so why are all the rows from the third in purple and not only the fourth row, not forgetting we start counting at 0. This is due to the way in which the ‘fill‘ function operates, by changing the the state of Processing. Therefore, as soon as ‘y‘ is equal to 3, then Processing’s fill state is changed by ‘fill‘ to the new colour, and remains in this state forever, or until we change it back. Thus to correct this behaviour, we need to specify a default state for the fill colour, white, which is called when ever ‘y‘ is not equal to 3.
There are two methods to solve this, the first is commonly used but slightly less elegant. The first method sets the fill state of Processing, for every iteration of the loop to white, and if y = 3 the fill state is overridden to purple:
for (int y = 0; y < 10; y++) {       // Outer Loop: Y - Rows
  for (int x = 0; x < 10; x++) {     // Inner Loop: X - Cols
    fill(255);                       // Set default fill colour
    if (y == 3) {                    // Check if the y value is equal to 3
      fill(128, 64, 255);            // Fill using a purple colour
    }
    rect(x*10,y*10,5,5);             // Draw a box at {x * 10,y * 10} with the size 5px by 5px
  }
}
2.7.1 Else
However, the above code will call the ‘fill‘ function twice when y = 3, first setting the colour fill to white and then overriding this setting if y = 3. There is a more elegant way to write this code, to avoid the double call of ‘fill‘, which can be achieved through the use of an ‘else‘ statement. When the condition is true, we perform that, else we perform the other action. As seen in the code bellow:
for (int y = 0; y < 10; y++) {       // Outer Loop: Y - Rows
  for (int x = 0; x < 10; x++) {     // Inner Loop: X - Cols
    if (y == 3) {                    // Check if the y value is equal to 3
      fill(128, 64, 255);            // Fill using a purple colour
    } else {
      fill(255);                     // Set default fill colour when y <> 3
    }
    rect(x*10,y*10,5,5);             // Draw a box at {x * 10,y * 10} with the size 5px by 5px
  }
}
Notice the way we include the ‘else‘ statement, on line 5, which forms part of our ‘if‘ statement by including else directly after the closing ‘}‘ on the same line and then encasing the code we wish to execute for the else statement within its own braces ‘{‘ and ‘}‘. Also pay attention to the spacing of the code achieved using the TAB key, this is a coding convention that helps us visually distinguish blocks of code that are encased within a preceding conditional statement, loop, custom function or class.
2.7.2 Or (||)
However, we’ve not completed our original problem which was to colour both a single row and a single column. To achieve this lets attempt to colour the eighth column (‘x== 7‘) and the fourth row (‘y == 3‘). The solution is through the use of the ‘or‘ operator, which is written as two vertical lines ‘||‘:
for (int y = 0; y < 10; y++) {       // Outer Loop: Y - Rows
  for (int x = 0; x < 10; x++) {     // Inner Loop: X - Cols
    if (y == 3 || x == 7) {          // Check if the y value is 3 OR if the x value is 7
      fill(128, 64, 255);            // Fill using a purple colour
    } else {
      fill(255);                     // Set default fill colour when y <> 3
    }
    rect(x*10,y*10,5,5);             // Draw a box at {x * 10,y * 10} with the size 5px by 5px
  }
}
When using the ‘or‘ operator, line 3, if either the first half of the condition is true or the second half is true, the code within our braces will be executed. Don’t forget that our ‘if‘ function executes the code when the condition is true and the use of the ‘or‘ operator means that only one condition needs to be true for the conditional statement to read true. To illustrate this more easily lets define the left side of the condition (‘y == 3‘) as A and the right side of the condition (‘x == 7‘) as B. In this illustration think of A and B as variables, which can take one of two values, either ‘true‘ or ‘false‘. These are called ‘boolean‘ variables. The table bellow illustrates the use of the ‘or‘ operator within an if statement:
A |
B |
A || B |
| false | false | false |
| true | false | true |
| false | true | true |
| true | true | true |
2.7.3 And (&&)
Lets now try work out how to only highlight the box at the intersection of the eighth column and fourth row. To achieve this we need to use another logical operator, ‘and‘. See the bellow table to see the difference between the ‘and‘ and ‘or‘ operator:
A |
B |
A && B |
| false | false | false |
| true | false | false |
| false | true | false |
| true | true | true |
Notice that the logical ‘and‘ operation has a somewhat more obvious symbol in Processing, two ampersands. In our previous example, if we replace the ‘or‘ operator ‘||‘ with an ‘and‘ operator ‘&&‘, the if statement will only evaluate to true when both sides are true, hence both ‘y‘ is equal to 3 and ‘x‘ is equal to 7. This will therefore highlight the box at the seventh column and fourth row. See bellow:
for (int y = 0; y < 10; y++) {       // Outer Loop: Y - Rows
  for (int x = 0; x < 10; x++) {     // Inner Loop: X - Cols
    if (y == 3 && x == 7) {          // Check if the y value is 3 AND if the x value is 7
      fill(128, 64, 255);            // Fill using a purple colour
    } else {
      fill(255);                     // Set default fill colour when y <> 3
    }
    rect(x*10,y*10,5,5);             // Draw a box at {x * 10,y * 10} with the size 5px by 5px
  }
}
2.7.4 Not (!)
Is it possible to do the inverse of the above example and highlight the column and row, yet exclude the intersecting box? The answer is yes, and there is another handy operator we can use to achieve this, referred to as the ‘not‘ logical operator. Unlike ‘or‘ and ‘and‘, ‘not‘ requires only one parameter (typically referred to as an argument). Where ‘and‘ and ‘or‘ need an A and a B condition, ‘not‘ simply works with ‘A’, a single condition. The symbol for ‘not‘ in Processing is an exclamation mark ‘!‘. Another way to think of the ‘not‘ logical operator is that it inverses the condition requirement for our ‘if‘ code to execute, no longer must the condition resolve to true but rather false. The table bellow helps visualise this:
A |
!A |
| false | true |
| true | false |
2.7.5 Exclusive Or
Looking back at the the table for the ‘or‘ operator you will notice that there are three possibilities to produce a true outcome. Processing lacks what is referred to as an ‘exclusive or‘ operator which operates similarly to a standard ‘or‘ operator but exclusively resolves to true if either condition A or B is true, yet, in the event A and B are both true resolves false. We require an ‘exclusive or‘ operation to highlight the column and row, yet exclude the intersecting box, but as Processing lacks this we are required to code such conditional logic ourselves. The ‘not‘ operator will facilitate the creation of an ‘exclusive or‘.
First we construct the highlight condition for the column and row as before: ‘y == 3 || x == 7‘. Now we need the condition to be true for the row and column apart from when ‘ y == 3‘ and ‘x == 7‘, that is, apart from ‘y == 3 && x == 7′. The logic for this would be its inverse, written in Processing as:!(y == 3 && x == 7). Notice that the brackets define the statement to which we wish to apply the ‘not‘ condition. Now, we want both these conditions to be true at the same time in order to highlight the column and row, yet not their intersection. Hence, we want both ‘y == 3 || x == 7′ and ‘!(y == 3 && x == 7)’ to be true at the same. Or put a bit more straight forward: either one or the other and not both of them. The code to apply, such our ‘exclusive or‘ looks as follows:
for (int y = 0; y < 10; y++) {                         // Outer Loop: Y - Rows
  for (int x = 0; x < 10; x++) {                       // Inner Loop: X - Cols
    if ((y == 3 || x == 7) && !(y == 3 && x == 7)) {   // Manual Exclusive OR operation
      fill(128, 64, 255);                              // Fill using a purple colour
    } else {
      fill(255);                                       // Set default fill colour when y <> 3
    }
    rect(x*10,y*10,5,5);                               // Draw a box at {x * 10,y * 10} with the size 5px by 5px
  }
}
2.7.6 Regular Patterns
It’s also possible to use ‘if’s to generate regular patterns, such as recurring patterns of highlighted rows. There is a trick we can use to achieve this (and has a range of other uses), and it is the ‘%‘ operator. ‘%‘ or modulo is calculates (and returns) the remainder after division. With integer division, if we divide 14 by 4, the result is 3, with a remainder of 5. Modulo will return the value of 5 in this example. This could be expressed as ‘14%4‘ = 5.
With modulo can be used to highlight every fourth row. ‘0%4’ is 0, ‘1%4’ is 1, ‘2%4’ is 2, ‘3%4’ is 3, but, ‘4%4’ is 0 once again, ‘5%4’ is 1 and so forth. Thus, if we utilise the condition ‘y % 4 == 0‘, then all rows divisible by four will be highlighted, hence row 0, 4, 8 and so on, as so:
for (int y = 0; y < 10; y++) {       // Outer Loop: Y - Rows
  for (int x = 0; x < 10; x++) {     // Inner Loop: X - Cols
    if (y % 4 == 0) {                // Is y divisible by 4? Then cont...
      fill(128, 64, 255);            // Fill using a purple colour
    } else {
      fill(255);                     // Set default fill colour when y <> 3
    }
    rect(x*10,y*10,5,5);             // Draw a box at {x * 10,y * 10} with the size 5px by 5px
  }
}
2.8 Closing Thoughts On Loops and Ifs
We’ve now covered almost all there is to know about implementing conditions, loops, and logical operators which make up what can be referred to as ‘program control’ — the ‘for‘s and ‘if‘s which alter the order by which a program executes its list of instructions — repeating certain instructions or all together ignoring others based on previous criteria (conditions). However, whilst we’ve covered how to use these programming constructs this should not be considered an exhaustive list of their uses and capabilities! You may not be presently aware of just how much programming knowledge you have just gained, but you are in fact ready to start exploring Processing on your own, experimenting with ideas and adapting code from others, which you will now be able to read and understand. From here on out we will be using this knowledge in new and inventive ways to produce novel outputs. If you’re feeling a little overwhelmed, that is perfectly normal, don’t forget that the Processing References page will aid you.
3. Translation and Animation
Lesson three starts with an introduction to coding our own bespoke functions, before diving into the more complex world of Processing’s translation, rotation and animation functions. We will explore how to translate a rectangle and progressively introduce a couple of functions so that we are able to animate and rotate boxes.
Key programming concepts:
functions, event loops, local and global variables (variable scope)
Key geometric concepts:
rotation, translation, local and global coordinate matrix
3.1 Introduction
In the previous section 2.2 Loops we discussed the concept of a loop in programming. Most programs in fact operate within a loop, with a set number of recursions or an undefined number. They wait for events, such as a user input (key press) and once revived they react to this input, drawing something on the canvas in response or altering the value of a variable. The program proceeds to loop round to wait for more events, draws on the canvas and so on. Processing distinguishes itself from native Java, or many other languages, as it is targeted towards visual designers and provided a ready to use canvas to draw animations onto. For Processing to do this, it fact needs to constantly loop, to facilitate the drawing of animations. Picture this as similar to a sketchbook animation, each alteration is a new frame, which can override or overlay the preceding frame. Processing in fact loops through the code you wish to display on the canvas 60 times per second (can be changed). Up till now we’ve not implemented this and our drawings are static, the code (excluding our own ‘for‘ loops) has been executed once.
3.2 Custom Functions To Draw (Shapes)
Thus far we have relied on Processing’s built in functions to do the hard work of drawing rectangles and other shapes for us. However, our handy ‘rect‘ function is actually comprised of smaller subsections which are combined to draw a rectangle. The simplest subsection within a Processing function is to draw a single pixel onto the canvas. The pixel requires a colour, and its possible to create a colour as a variable like we’ve done previously for an int variable, by making a variable of the colour type. Like this:
color magenta = color(255, 0, 255);    // Declare a new variable called magenta as type color and assign it magenta
set(10,10,magenta);                    // Set the pixel at coordinates {10,10} to the colour magenta
It’s important to notice how we create a colour variable, or in this case ‘constructed‘ it by typing color(255, 0, 255). You will hear more about ‘constructed‘ as we venture into classes later.
On Line 1, specifically the code ‘color(255, 0, 255)’ instructs Processing what colour the variable will store, like we earlier assigned an integer to be ‘contained‘ by an integer type variable. Line 2 shows how we can set a pixel using the ‘set‘ function which requires three parameters, an x and y coordinate followed by a colour, which can be a colour code or as we’ve done a colour variable.
The bellow code takes the same principle we established in the previous section to draw a grid, and pixels are pretty much just a grid of rectangles. But pay attention to how the border (white) pixels are produced using the ‘if‘ statement on line 6.
Now this is a rather large amount of code and if you were using Java as apposed to Processing this is more or less how you would go about creating a rectangle, as Java and most languages don’t come standard with built in functions to draw rectangles, though they do have libraries which can, such as Processing.
Now if you wanted to draw another rectangle maybe slightly different to the last, you would need to rewrite all this code again, and again. But that would be silly, we could use a loop, yes, but there is a better mechanism which allows us to encapsulate our new ‘redundant’ rectangle code into a single command, hence to write our very own function.
Now you have in fact already written your first function, however, you have not seen it up till now. the function being ‘setup‘. That is because if the ‘setup‘ function is left out Processing will automatically add it before you run (compile) your code. Your code won’t change, but the code Processing uses to run the sketch, the pure Java code will have this function. Take a look at the Java Code tab to see what the code look like once converted to Java, and see if you can find the missing ‘setup‘ function!
int boxSize = 20;                                    // Declare a new variable as type int and assign it 20
color magenta = color(255, 0, 255);                  // Declare a new variable as type color and assign it magenta
color white = color(255);                            // Declare a new variable as type color and assign it magenta
for(int y=0; y < boxSize; y++){                      // Outer Loop: Y - Pixels
  for(int x=0; x < boxSize; x++){                    // Inner Loop: X - Pixels
    if (y == 0 || x == 0 || y == boxSize-1 || x == boxSize-1) {    // Border pixels: If any of the following
      set(y,x,white);                                              // Set this pixel to white
    } else {                                         // Else
      set(y,x,magenta);                              // Set this pixel to magenta (inner pixels)
    }
  }
}
import processing.core.*;
import processing.data.*;
import processing.event.*;
import processing.opengl.*;
import java.util.HashMap;
import java.util.ArrayList;
import java.io.File;
import java.io.BufferedReader;
import java.io.PrintWriter;
import java.io.InputStream;
import java.io.OutputStream;
import java.io.IOException;
public class temp extends PApplet {
public void setup() {
int boxSize = 20; // Declare a new variable as type int and assign it 20
int magenta = color(255, 0, 255); // Declare a new variable as type color and assign it magenta
int white = color(255); // Declare a new variable as type color and assign it magenta
for(int y=0; y < boxSize; y++){ // Outer Loop: Y - Pixels
for(int x=0; x < boxSize; x++){ // Inner Loop: X - Pixels
if (y == 0 || x == 0 || y == boxSize-1 || x == boxSize-1) { // Border pixels: If any of the following
set(y,x,white); // Set this pixel to white
} else { // Else
set(y,x,magenta); // Set this pixel to magenta (inner pixels)
}
}
}
noLoop();
}
static public void main(String[] passedArgs) {
String[] appletArgs = new String[] { "temp" };
if (passedArgs != null) {
PApplet.main(concat(appletArgs, passedArgs));
} else {
PApplet.main(appletArgs);
}
}
}
As we progress towards more complex sketches with animations we will need this function, therefore, from now on we will include ‘setup‘ explicitly. All the code we currently have written needs to be encapsulated within the ‘setup‘ function’s braces ‘{‘ and ‘}‘, as follows:
void setup() {                                         // Call the setup function
  int boxSize = 20;                                    // Declare a new variable as type int and assign it 20
  color magenta = color(255, 0, 255);                  // Declare a new variable as type color and assign it magenta
  color white = color(255);                            // Declare a new variable as type color and assign it magenta
  for(int y=0; y < boxSize; y++){                      // Outer Loop: Y - Pixels
    for(int x=0; x < boxSize; x++){                    // Inner Loop: X - Pixels
      if (y == 0 || x == 0 || y == boxSize-1 || x == boxSize-1) {    // Border pixels: If any of the following
        set(y,x,white);                                              // Set this pixel to white
      } else {                                         // Else
        set(y,x,magenta);                              // Set this pixel to magenta (inner pixels)
      }
    }
  }
}
You won’t notice any change to the output of your sketch as we are simply doing something which Processing has previously done automatically for us. However, we need to start explicitly calling the ‘setup‘ function to encapsulate code we don’t wish to be part of Processing’s animation (draw) loop, hence code we need to be run once, at the start of our sketch. The format of the ‘setup‘ function is quite similar to an ‘if‘ or ‘for‘, however, it has an extra name added. The first word ‘void‘ means ‘nothing‘, as in the function we are writing will not return a result, this will be covered in more detail further on. For now when ever we wish to write our own function we first write the word ‘void‘, which is followed by the name of the function, in this case ‘setup‘. Processing will also set the word ‘setup‘ to bold, which indicates that this function is built into Processing. It’s important that we don’t use a name for our own function which is already associated with a built in Processing function. What we are telling Processing here is to ‘call‘ the function with the name ‘setup‘ which will not return any data. ‘Call‘ here means the same is it did earlier when for example we ‘call the function point’. Calling a function is simply a way to tell the computer to ‘lookup’ and execute a set of code which has been grouped and assigned a unique identification name. In the following example we have grouped the code we wrote to draw a box into its own custom function. Calling this function draws the box on the canvas.
We’ve already written a function, thus lets write another, simply by changing the name of our current function. Changing ‘setup‘ to ‘drawRect‘, as so:
void drawRect() {                                      // Define a custom function, with the name drawRect and enclose the following code
  int boxSize = 20;                                    // Declare a new variable as type int and assign it 20
  color magenta = color(255, 0, 255);                  // Declare a new variable as type color and assign it magenta
  color white = color(255);                            // Declare a new variable as type color and assign it magenta
  for(int y=0; y < boxSize; y++){                      // Outer Loop: Y - Pixels
    for(int x=0; x < boxSize; x++){                    // Inner Loop: X - Pixels
      if (y == 0 || x == 0 || y == boxSize-1 || x == boxSize-1) {    // Border pixels: If any of the following
        set(y,x,white);                                              // Set this pixel to white
      } else {                                         // Else
        set(y,x,magenta);                              // Set this pixel to magenta (inner pixels)
      }
    }
  }
}
When you run this sketch you will notice the canvas is empty. This is because though we have defined our custom rectangle drawing function we have not in fact told Processing to ever execute this code. Also note that we have used tabs to indent the code which is contained within our ‘drawRect‘ function between lines 1 and 14.
To tell Processing to execute our ‘drawRect‘ function we need to add a line of code which will call this function. To do this we need to re-add the previous function ‘setup‘ and within setup we will call our ‘drawRect‘ function, as so:
void setup(){
   drawRect();                                         // Call our custom rectangle drawing function
}

void drawRect() {                                      // Define a custom function, with the name drawRect and enclose the following code
  int boxSize = 20;                                    // Declare a new variable as type int and assign it 20
  color magenta = color(255, 0, 255);                  // Declare a new variable as type color and assign it magenta
  color white = color(255);                            // Declare a new variable as type color and assign it magenta
  for(int y=0; y < boxSize; y++){                      // Outer Loop: Y - Pixels
    for(int x=0; x < boxSize; x++){                    // Inner Loop: X - Pixels
      if (y == 0 || x == 0 || y == boxSize-1 || x == boxSize-1) {    // Border pixels: If any of the following
        set(y,x,white);                                              // Set this pixel to white
      } else {                                         // Else
        set(y,x,magenta);                              // Set this pixel to magenta (inner pixels)
      }
    }
  }
}
The ‘call‘ to the ‘drawRect‘ function is similar to the call to the ‘rect‘ function, only our ‘drawRect‘ function has no parameters, to define the rectangles position, size, etc. Therefore, we only need to write: drawRect();, notice the inclusion of empty round brackets, which are required even though there are no parameters. Our ‘drawRect‘ function is rather useless without being able to set the size and position of our rectangle, so lets add this functionality to our ‘drawRect‘ function:
void setup() {
  drawRect(width/2-25, height/2-25, 50, 50);             // Call our rectangle function passing its x and y position and, width and height
}

/*
   * FUNCTION: drawRect
 *
 * Description: A function which draws a magenta rectangle with a white border
 *
 * @param {int}     posX            - x position translation for rectangle
 * @param {int}     posY            - y position translation for rectangle
 * @param {int}     w               - width of rectangle
 * @param {int}     h               - height of rectangle
 */

void drawRect(int posX, int posY, int w, int h) {
  color magenta = color(255, 0, 255);                    // Declare a new variable as type color and assign it magenta
  color white = color(255);                              // Declare a new variable as type color and assign it magenta
  for (int y=0; y < h; y++) {                            // Outer Loop: Y - Pixels while y is less than height (h)
    for (int x=0; x < w; x++) {                          // Inner Loop: X - Pixels while x is less than width (w)
      if (y == 0 || x == 0 || y == h-1 || x == w-1) {    // Border pixels: If any of the following
        set(x+posX, y+posY, white);                      // Set the pixel at (x plus the posX) and (y plus the posY) translation to white
      } else {                                           // Else
        set(x+posX, y+posY, magenta);                    // Set the pixel at (x plus the posX) and (y plus the posY) translation to magenta
      }
    }
  }
}
Lets take a look at the four parameters we’ve added to our ‘drawRect’ function, on line 16: (int posX, int posY, int w, int h). We’ve declared ‘posX‘ and ‘posY‘ as integer variables to pass the coordinates for our rectangle to be drawn at and we’ve declared ‘w‘ and ‘h‘ as integer variables to pass the width and height for our rectangle. Each of these parameters are required every time we call our ‘drawRect’, therefore we need to alter our call. As done on line 2: drawRect(width/2-25, height/2-25, 50, 50);, where we’ve set the x-coordinate equal to the ‘canvas width divided by 2 minus 25‘, the y-coordinate equal to the ‘canvas height divided by 2 minus 25‘ and both the width and height for our rectangle to 50 pixels.
For the above to take effect we need to make some changes to the code within our ‘drawRect’ function, which needs to use these values to alter the rectangle size and position. Lets start with the width and height parameters, ‘w‘ and ‘h‘. Our loop(s) needs to iterate as many times as the rectangles height and width, therefore these lines need to be changed so that the ‘for‘ loop uses the ‘w‘ and ‘h‘ parameters we’ve passed, thus we alter the loop’s condition statement to be: ‘y < h‘ and ‘x < w‘. Now our loop knows how many times to loop. Next our ‘if‘ statement needs to be updated to know when the loop(s) have reached the boundary of the rectangle. Therefore we change the condition statement to include the ‘w‘ and ‘h‘ parameters as such: ‘(y == 0 || x == 0 || y == h-1 || x == w-1)‘. Now the size of our rectangle is no longer defined by a static value.
Next we need to change our ‘drawRect’ function to know where to draw the rectangle, based on the ‘posX‘ and ‘posY‘ parameters. This can be achieved by adding these parameters to the ‘set‘ function, hence ‘x+posX‘ and ‘y+posY‘.
When this sketch is run Processing will start by executing the ‘setup‘ function, when it reaches line 4 Processing will skip to line 18, as we’ve told it to look for the function ‘drawRect’ and execute the code contained in this function, and will pass the ‘drawRect’ function values for the x-position, y-position, width and height.
Check that you understand exactly how this sketch works. In particular, the way ‘h – 1‘ and ‘w – 1‘ have been used to draw the right-hand side and the bottom of the rectangle, and how the values of ‘width/2-25‘, ‘height/2-25‘, ‘50‘ and ‘50‘ are passed to the parameters of ‘posX‘, ‘posY‘, ‘w‘ and ‘h‘ within the ‘drawRect’ function. Also pay attention to how within (int posX, int posY, int w, int h) the variables must have their type, integer, declared, so that the function knows what type of data it is using. Hence if you were to call the function with values which are not integer types, such as, floats or strings, Processing would object.
Finally, we can demonstrate the benefit and flexibility of defining our own functions, as we could extend the ‘drawRect’ function to take and use more parameters such as a colour parameter. We can also use the ‘drawRect’ function multiple times which different parameters. As follows:
void setup() {
  size(220,220);
  background(39,40,34);
  for (int i = 0; i < 10; i++) {
    for (int j = 0; j < 10; j++) {
      drawRect(i*20, j*20, i*2, j*2);
      drawRect(i*20, j*20, j*2, i*2);
    }
  }
}
...
3.3 Translating (Shapes)
Before we can move onto animating shapes using functions, it would be beneficial to cover two more Processing functions which allow us to translate and rotate. Our goal by the end of this section will be to have successfully translated, rotated many rectangles and have animated them. In the following lessons we will take these ideas further allowing us to create more interesting and interactive sketches, which demonstrate the power of using Processing as a design tool.
Earlier we covered one method to translate rectangles across the canvas, which was through the use of a parameter, as follows:
for (int i = 0; i < 10; i++) {      // Loop 10 times, with an increment of 1
  rect(i*10, 0, 5, 5);              // Draw a rectangle at {i*10,0} with a width and height of 5px
}
However there is an alternative method to achieve the same thing, and this method will become incredibly important and powerful to use later:
for (int i = 0; i < 10; i++) {      // Loop 10 times, with an increment of 1
  rect(0, 0, 5, 5);                 // Draw a rectangle at {0,0} with a width and height of 5px
  translate(10, 0);                 // Displace objects within the display window by 10px to right, cumulatively
}
As you can see the result of the above codes produce the same output, however, they are in fact achieving this through vastly different methods. In the new method we have used a function called ‘translate‘ on line 3, which can be used to displace objects within the display window by a set x and y value. However, ‘translate‘ does not in fact move the rectangle, but rather moves the set origin point within the Processing canvas. This translation or the origin is cumulative. Hence if we call ‘translate‘ twice with the parameters (‘10,0‘) we would have shifted the origin 20 pixels in the x direction, towards the right. Processing can have multiple origin points, each a child of the previous, and relative to its position, however, the first origin point is referred to as the global coordinate frame. In the above code we are instructing Processing to loop through a set of code 10 times. First drawing a rectangle at {0,0} (origin) followed by translating the global coordinate frame 10 pixels to the right. The following happens 10 times and on each loop our rectangle is drawn at the origin point, yet the origin has been successively shifted 10 pixels, thus it appears that each successive rectangle has been translated to the right.
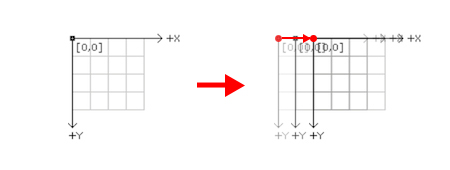
After our loop is finished if we wanted to draw a rectangle at the starting origin, we would have to write: rect(-100, 10, 5, 5);, as the global coordinate frame has been shifted a total of 100 pixels to the right, meaning our starting origin is now 100 pixels to the left of the global coordinate frame.
You may be thinking this is a rather complicated way to move a shape, however it becomes necessary when we start to think about how we might rotate a shape, say a box.
3.4 Rotating (Shapes)
We will begin with the simplest of rotations. Lets draw a square in the middle of the screen and rotate it by 20 degrees. We will first need to work out what 20 degrees is within Processing’s units, which are radians.
Radians are based on the relationship of the circumference of a circle to its radius. If the radius of the circle is r (a mathematician’s variable, it could be anything, two, fifty, or nine thousand), then circumference is 2 x π x r, where π (is English, pronounced ‘pie’) is about 3.141. Mathematicians usually chop the multiplication signs and write 2πr. One radian is simply one radius of the circle round the circumference. Therefore to go 360° round the circumference, you have to move round 2π radii, so there are 2π radians to a full circle, or 360°. This leads to people talking of angles in terms of multiples of π — you will often hear ‘half pie’ (90°) and ‘two pie’ (360°). So often, that Processing has two special variables for them ‘HALF_PI‘ and ‘TWO_PI‘.
But that’s enough of radians, let us use them. Thus 20 degrees is about 0.35 radians. So, first draw a box rotated by 0.35 radians:
rect(40, 40, 20, 20);    // Draw rect, with position at center and a size of 20 pixels
rotate(0.35);            // Rotate by 20 deg
This results in box at the centre of the screen, yet unrotated. The first mistake we have made is thinking of drawing a box and then rotating it. Yet, remember in Processing, the coordinate frame is rotated and then the box is drawn, not the other way around. Thus we need:
rotate(0.35);            // Rotate by 20 deg
rect(40, 40, 20, 20);    // Draw rect, with position at center and a size of 20 pixels
However, this has resulted in a box shifted 20 degrees about the origin of the canvas {0,0}. It is a little difficult to visualise this in our head, with only a box, so to see it more easily we can draw a frame the size of the canvas which represents the canvas itself. To achieve this we can do the following:
rotate(0.35);            // Rotate by 20 deg
noFill();                // Set fill state to empty
rect(0,0,width,height);  // Draw rect, with position at 0,0 and size equal to canvas
fill(255);               // Set fill state 'back' to white
rect(40, 40, 20, 20);    // Draw rect, with position at centre and a size of 20 pixels
To make this even easier to understand, and before moving on, it is probably best to visualise the rotation through rotating the canvas continually.
3.5 Continuous Rotation (introducing draw)
So that we can see exactly what is happening to the global coordinate frame in which we are drawing the rectangle, it is helpful to watch it move in action. To do this, we can implement another standard function in Processing, the ‘draw‘ function. In Processing, ‘draw‘ is called to draw the scene, then, once the scene has been drawn, it is called again, and again, and again.
The code bellow is my first attempt to make a continuously rotating rectangle. Notice that I have decided to make the rectangle rotate only a tiny amount, 0.0175 radians, or about 1 degree, every frame (that is, each time Processing draws my rectangle):
void draw() {
  rotate(0.0175);          // Rotate by 1 deg
  rect(40, 40, 20, 20);    // Draw rect, with position at center and a size of 20 pixels
}
Though, when you run this sketch it is evident that we don’t have a constantly rotating rectangle, as it is static. However, if you look closer at the rectangle you may be able to see that the rectangle has rotate approximately a single degree. Unlike the previous for loop, where each call to the ‘translate‘ function, translated the global frame cumulatively, the global coordinate frame is reset each time the code in the ‘draw‘ function is executed. Thus, we are in fact rotating the global coordinate frame a bit, drawing our rectangle, then Processing resets the global coordinate frame, we rotating the global coordinate frame a bit, and so on.
There is a method which allows us to remember the previous rotation, which makes use of a variable, which we will call ‘frame’ which will store the number of the frame we are displaying. Each time the ‘draw‘ function runs, we will increment ‘frame‘ by one, using the ‘++‘ operator. Then, we can multiple the amount of rotation we apply by the number stored by our ‘frame‘ variable. Thus frame one will be 1 x 0.0175 radians, frame two will be 2 x 0.0175 radians and so on:
It’s important to take note of two points before we continue. You will see we have declared and assigned the ‘frame‘ variable on line 1: int frame = 0; which has been written outside of the ‘draw‘ function.
This is referred to as creating a global variable which can be used by any and all functions throughout our sketch. Global variables are incredibly handy for storing settings for your entire project, which many functions need access to. However, it’s still recommended to only use global variables where you absolutely need them.
This is important, as if we had included the ‘frame‘ variable within the ‘draw‘ function we would be in the same situation as the previous example, with a static box, as every time draw runs we reset the value of ‘frame‘ to 0, instead of allowing it to increment for every iteration of ‘draw‘. Secondly we need to increment ‘frame‘ within the ‘draw‘ function, so that for every iteration of ‘draw‘ the value of ‘frame‘ increases, see line 3.
At last we have a moving box and if you wait a few seconds you will see the box return and complete the circle! However, we can only see a quarter of the circle formed by our boxes. But is this what we initially wanted? The answer is an emphatic no. Firstly we can see multiple boxes, one behind the last. The reason for this is that we are kind of drawing the frames of our animation on tracing paper, in such that our background is never reset. So lets first solve this by redrawing the background before our rectangle is drawn. This can be achieved as so:
int frame = 0;             // Declare integer type variable and assign it the value 0
void draw() {
  frame++;                 // Increment our frame counting variable by 1
  background(192);         // Redraw the background
  rotate(0.0175 * frame);  // Rotate by 1 deg, each frame
  rect(40, 40, 20, 20);    // Draw rect, with position at centre and a size of 20 pixels
}
Finally, our animation looks a little more like what we had initially intended, though we still need to address the fact that the box is spinning ‘off axis’ as we are not really rotating the box itself but rather the global coordinate frame which the box is drawn on, as discussed earlier in section 3.4 Rotating (Shapes). We will address this in the next section.
Now maybe our box is rotating a little to fast for our preferences. There is a simple solution to this that does not involve altering the ‘frame‘ variable or the rotation logic but rather by altering how many times per second Processing will try to execute the ‘draw‘ function. To do this we need to include a call to the function ‘frameRate‘ which accepts a single integer type parameter. Lets try altering the default frameRate which Processing automatically sets from 60 to 24, as follows:
int frame = 0;                             // Declare integer type GLOBAL variable and assign it the value 0

void setup() {
  frameRate(24);                           // Set frame rate to 24
}

void draw() {
  frame++;                                  // Increment our frame counting variable by 1
  background(39,40,34);                     // Redraw the background
  rotate(0.0175 * frame);                   // Rotate by 1 deg, each frame
  rect(width/2-10, height/2-10, 20, 20);    // Draw rect, with position at center and a size of 20 pixels
}
Notice that the declaration for our ‘frame‘ global variable remains outside of the ‘setup‘ function, since it is being used in the ‘draw‘ function, had we included it in setup the scope of the ‘frame‘ would have been limited to within setup, thus ‘frame‘ would not be a global variable.
3.6 Rotating A Rectangle On Its Axis
What is noticeable about all our previous attempts at rotating a box is that in each case the rotation occurs around the global origin {0,0}. How can we make the box rotate around another location, such as, its centre? The solution is not actually that complicated if you think about what we are in fact rotating, the coordinate frame. Therefore, if we simply ‘pick up’ the global coordinate frame, move it to the centre of the canvas, and rotate it (around its own origin), and then draw the box in the resultant coordinate frame:


The diagram above helps visualise what we need to do. Firstly we need to translate the global coordinate frame to the centre of the canvas, followed by rotating it, then we need to draw a box with its corner at {-10, -10}, assuming we make the box 20 pixels high and 20 pixels wide:
void draw() {
  background(39,40,34);               // Redraw the background
  translate(width/2, height/2);       // Translate coordinate frame to canvas centre
  frame++;                            // Increment our frame counting variable by 1
  rotate(0.0175 * frame);             // Rotate by 1 deg, each frame
  rect(-10, -10, 20, 20);             // Draw rect, with its corner shifted left by 10 and up by 10 and a size of 20 pixels
}
Instead of drawing our box at {-10,-10}, i.e., shifted half its height and width. Its possible to rather translate the global coordinate frame again, after we have translated it to {width/2, height/2} and rotated it around the centre of the canvas. Thus following this we could shift the coordinate frame back {10, 10}, see line 6. When doing this we then draw the rectangle at the coordinates {0,0} as this would in fact be the new origin point which is already 10 pixels to the left and 10 pixels above the centre of the canvas:

void draw() {
  background(39,40,34);               // Redraw the background
  translate(width/2, height/2);       // Translate coordinate frame to canvas centre
  frame++;                            // Increment our frame counting variable by 1
  rotate(0.0175 * frame);             // Rotate by 1 deg, each frame
  translate(-10, -10);                // Translate (shift) coordinate frame by half the size of our box
  rect(0, 0, 20, 20);                 // Draw rect at {0,0} with a size of 20 pixels
}
The general principles explored above will become quite common in the future: move somewhere, rotate, translate back, rotate and so on. However, this does become rather tedious to constantly work out exactly how far we need to move the box in the global coordinate frame to centre its rotation. Thus as mentioned earlier we can turn to Processing’s alternative draw modes for native shapes such as rectangles and ellipses. Thus rather than the top left-hand corner, Processing will automatically draw our rectangle based on its centre. To do so, we change the rectangle mode, by calling the function ‘rectMode‘ with a special parameter ‘CENTER’ (remember, though it is in capital letters, ‘CENTER’ is simply a variable name). Now we can omit the readjustment of the coordinate frame before drawing. Also note that in this example I have used another feature of Processing, the Processing variable ‘frameCount‘. This is a built-in global variable that performs exactly the same function as our variable ‘frame‘ did. It is included within Processing as it is so common to use a variable to remember the current frame number.
void setup(){
   rectMode(CENTER);                  // Set Processing to draw rectangles from their center
}

void draw() {
  background(39,40,34);               // Redraw the background
  translate(width/2, height/2);       // Translate coordinate frame to canvas center
  rotate(0.0175 * frameCount);        // Rotate by 1 deg, each frame using frameCount
  rect(0, 0, 20, 20);                 // Draw rect at {0,0} with a size of 20 pixels
}
3.7 Multiple Independent Rotating Rectangles
As a means to demonstrate the limitations of only having a single coordinate frame to reference, I would like to attempt to display a row of boxes which rotate on their own axes, as we did in the previous section 3.3 Translating (Shapes). As a first step towards this we may write something like this:
void setup(){
   rectMode(CENTER);                  // Set Processing to draw rectangles from their centre
}

void draw() {
  background(39,40,34);               // Redraw the background
  translate(width/4, height/2);       // Translate coordinate frame to canvas centre, yet shifted slightly to the left
  for (int i = 0; i < 4; i++) {       // Loop 4 times: each time rotating, drawing rect and translating
    rotate(0.0175 * frameCount);      // Rotate by 1 deg, each frame using frameCount
    rect(0, 0, 20, 20);               // Draw rect at {0,0} with a size of 20 pixels
    translate(20,0);                  // Shift the global coordinate frame 20 pixels to the right
  }
}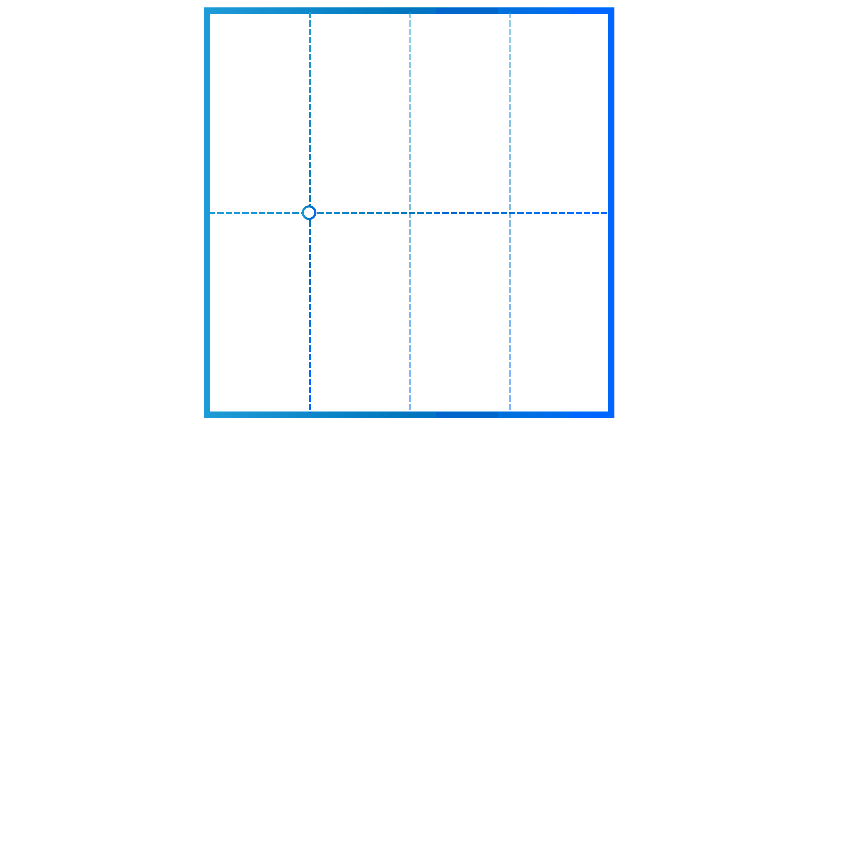
I will bet the above example is not working quite as you intended, though it is quite an interesting and elegant, if unexpected outcome. We see a row of boxes essentially wind in on themselves until they are tightly wound and then unwind, so on and so forth. We can understand this behaviour by looking at the diagram to the left.
The coordinate frame is first moved down the page, then it is rotated, then translated in the rotation direction, then rotated a bit more, and then translated using the new rotated coordinated frame:
In order to stop the boxes spiralling out of control, its imperative that after rotating and drawing a box, we undo the rotation of the coordinate frame again, then translate, the unrotated coordinate frame, re-rotate it and so on. Which can be done like:
void setup(){
   rectMode(CENTER);                  // Set Processing to draw rectangles from their center
}

void draw() {
  background(39,40,34);               // Redraw the background
  translate(width/4, height/2);       // Translate coordinate frame to canvas centre
  for (int i = 0; i < 4; i++) {       // Loop 4 times: each time rotating, drawing rect and translating
    rotate(0.0175 * frameCount);      // Rotate by 1 deg, each frame using frameCount
    rect(0, 0, 20, 20);               // Draw rect at {0,0} with a size of 20 pixels
    rotate(-0.0175 * frameCount);     // Un-rotate by 1 deg, each frame using frameCount
    translate(20,0);                  // Shift the global coordinate frame 20 pixels to the right
  }
}
Whilst you will find the above method works, it is inelegant, and if we try to draw anything more complex, where we have multiple rotations and translations, it could get very complicated. Therefore, I will now introduce a feature called a local coordinate frame.
A local coordinate frame can be add on top of the current position of the global coordinate frame. Think of the local coordinate frame as a child of the parent global coordinate frame, we can have multiple local coordinate frames all children of the global coordinate frame or even a local coordinate frame as a child to another local coordinate frame which is a child of the global coordinate frame. This is referred to within Processing as the concept of a matrix stack and is achieved through the use of two functions ‘pushMatrix()‘, which is used to save saves the current coordinate system followed by ‘popMatrix()‘, which is used to restores the prior coordinate system.
When we call ‘pushMatrix()‘ any future operations are only applied to the local frame. After using the local frame, it can be discarded by using ‘popMatrix()‘. The following example shows how to refactor our previous code to use a local frame (matrix stack), see lines 5 – 8:
void draw() {
  background(39,40,34);               // Redraw the background
  translate(width/4, height/2);       // Translate coordinate frame to canvas centre
  for (int i = 0; i < 4; i++) {       // Loop 4 times: each time rotating, drawing rect and translating
    pushMatrix();                     // Store the global coordinate frame, and create a local (child) coordinate frame
      rotate(0.0175 * frameCount);      // Rotate by 1 deg, each frame using frameCount
      rect(0, 0, 20, 20);               // Draw rect at {0,0} with a size of 20 pixels
    popMatrix();                      // Release the local coordinate frame and restore the global coordinate frame
    translate(20,0);                  // Shift the global coordinate frame 20 pixels to the right
  }
}
A couple of things to note: you always use ‘pushMatrix()‘ followed by ‘popMatrix()‘ and we include what we need drawn, in relation to its own local coordinate frame, between these two functions. I often indent the code, between ‘pushMatrix()‘ and ‘popMatrix()‘ to help visually separate what is contained within its own coordinate frame. You can kind of think of this like how we contain code within an ‘if‘ or ‘for‘ statement, yet in this case we don’t make use of braces ‘{‘ and ‘}‘.
Once you have mastered ‘pushMatrix()‘ and ‘popMatrix()‘ it is simple to achieve a row of boxes which rotate at independent speeds, without needing to uniquely un-rotate each of them:
void draw() {
  background(39,40,34);                 // Redraw the background
  translate(width/4, height/2);         // Translate coordinate frame to canvas centre
  for (int i = 0; i < 4; i++) {         // Loop 4 times: each time rotating, drawing rect and translating
    pushMatrix();                       // Store the global coordinate frame, and create a local (child) coordinate frame
      rotate(0.0175 * i * frameCount);  // Rotate by 1 deg multiplied by the loop index multiplied by the frameCount
      rect(0, 0, 20, 20);               // Draw rect at {0,0} with a size of 20 pixels
    popMatrix();                        // Release the local coordinate frame and restore the global coordinate frame
    translate(20,0);                    // Shift the global coordinate frame 20 pixels to the right
  }
}
3.8 Code Challenge (10PRINT)
Now for a little bit of fun! We are going to use much of what we have learnt, to attempt to create a version of the classic one-line Commodore 64 BASIC program which is inspired by the book 10 PRINT.
The following is based off of a single line program which was first demonstrated using the BASIC programming language on the Commodore 64 home PC which was introduced in January 1982. The original single line code was used to generate an interesting maze-like pattern where the generated pattern is formed by two symbols a back-slash ‘/‘ and a forward-slash ‘\‘, which character is used is based on probability. The code was as follows:
10 PRINT CHR$(205.5+RND(1)); : GOTO 10
Which generates patterns like:
First lets figure out how to draw a backward-slash and a forwards-slash, to do this we will use the ‘line’ function in Processing to simulate these characters as a diagonal lines. We will do all of this in the ‘draw‘ functions, don’t forget we also need a ‘setup‘ function, as follows:
  stroke(255);           // Set the stroke (outline) to white
  line(0, 0, 10, 10);    // Call line to draw a forward-slah \ (from {0,0} to {10,10})
  line(0, 10, 10, 0);    // Call line to draw a backwards-slah / (from {0,10} to {10,0})
Next we need to solve how we will introduce probability to draw either a back or forward slash. To do this we will make use of an ‘if‘ statement and a new function built into Processing called ‘random‘. Every time the ‘random‘ function in Processing is called it will generate an unexpected float between zero and the value of the high parameter we passed when calling random. We can set a range between which Processing will output a random float by passing more than one parameter. We will combine the ‘random‘ function with an ‘if‘ statement in order to generate random float between 0 and 1, such as 0.9 or 0.4. Next we will need a conditional in our ‘if‘ statement which will be used to determine the probability of either a back or forward slash being draw. This can all be achieved as follows:
  stroke(255);             // Set the stroke (outline) to white
  if (random(1) < 0.5){    // If random float is less than 0.5 draw a \ if greater than 0.5 draw a / (Hence a 50% probability)
    line(0, 0, 10, 10);    // Call line to draw a forward-slah \ (from {0,0} to {10,10})
  } else {
    line(0, 10, 10, 0);    // Call line to draw a backwards-slah / (from {0,10} to {10,0})
  }
When you ran this code you should have noticed that both a back-slash and a forward-slash are still visible, the reason for this is that we placed the code within our ‘draw‘ function, hence the code is run 60 times per second and on each run either a back-slash and a forward-slash are drawn. With a probability of 50%, it is reasonable to expect to see both characters when we call the code so many times.
Temporarily, try moving the ‘background‘ function to inside the ‘draw‘ function before any other code, after running the sketch you should notice how we randomly see many back-slash and a forward-slash being drawn, one after the other.
Furthermore, the characters are being drawn on top of one another, we need to adjust their position each time a new character is randomly determined and drawn, as if they are moving forwards such as in a console or text editor, thus getting us closer to the 10PRINT pattern in the image above. To achieve this we will need to set some global variables which will be used to determine the x and y coordinates where the character will be drawn, as follows:
int x = 0;                // Declare an integer type to keep track of the x position and assign it 0
int y = 0;                // Declare an integer type to keep track of the y position and assign it 0

void draw() {
  stroke(255);                     // Set the stroke (outline) to white
  if (random(1) < 0.5){            // If random float is less than 0.5 draw a \ if greater than 0.5 draw a / (Hence a 50% probability)
    line(x, y, x + 10, y + 10);    // Call line to draw a forward-slah \ (from {x,y} to {x+10,y+10})
  } else {
    line(x, y + 10, x + 10, y);    // Call line to draw a backwards-slah / (from {x,y+10} to {x+10,y})
  }
}
However, we still see our characters overlapping, to change this we need to alter the value of ‘x‘ and ‘y‘ by some incremental value every time draw is run. This incremental value should be equal to the spacing (size) we have used for our characters, which is presently a hard coded value of 10. We should probably change this to also use a global variable. We can start implementing these changes as so:
int x = 0;                // Declare an integer type to keep track of the x position and assign it 0
int y = 0;                // Declare an integer type to keep track of the y position and assign it 0
int spacing = 10;         // Declare an integer type to determine the size (spacing) of the characters

void setup(){
   size(800,400);
   background(0);
}

void draw() {
  stroke(255);                               // Set the stroke (outline) to white
  if (random(1) < 0.5){                      // If random float is less than 0.5 draw a \ if greater than 0.5 draw a / (Hence a 50% probability)
    line(x, y, x + spacing, y + spacing);    // Call line to draw a forward-slash \ (from {x,y} to {x+spacing,y+10})
  } else {
    line(x, y + spacing, x + spacing, y);    // Call line to draw a backwards-slash / (from {x,y+spacing} to {x+spacing,y})
  }
  x+=spacing;                                // Increment our x coordinate by spacing every frame
}Now that we’ve solved the overlapping of our characters, we need to figure out how to draw a new line, when the previous line gets to the canvas’s right edge. We can do this using another ‘if‘ statement, which will be called after each character is drawn to check if the value of ‘x‘ is greater than the width of the canvas. In the event that it is we will need to reset ‘x‘ to 0 and increase ‘y‘ by the variable ‘spacing‘, lines 21 – 23. Once, we’ve completed this we will essentially have completed producing the 10PRINT pattern in Processing:
int x = 0;                // Declare an integer type to keep track of the x position and assign it 0
int y = 0;                // Declare an integer type to keep track of the y position and assign it 0
int spacing = 20;         // Declare an integer type to determine the size (spacing) of the characters
float probability = 0.5;  // Set probability %

void setup() {
  size(400, 400);
  frameRate(60);
  background(0);
}

void draw() {
  strokeWeight(2);
  stroke(255);                               // Set the stroke (outline) to white
  if (random(1) < probability) {             // If random float is less than probability draw a \ if greater than probability draw a /
    line(x, y, x + spacing, y + spacing);    // Call line to draw a forward-slash \ (from {x,y} to {x+spacing,y+10})
  } else {
    line(x, y + spacing, x + spacing, y);    // Call line to draw a backwards-slash / (from {x,y+spacing} to {x+spacing,y})
  }
  x+=spacing;                                // Increment our x coordinate by spacing every frame
  if (x > width) {                           // If current line is at end of canvas' width
    x = 0;                                   // Rest x to 0
    y+=spacing;                              // Increase y by spacing
  }
}Congratulations on coding your first procedurally generated animated artwork in Processing

This relatively straight forward code produces a wonderfully elaborate maze like pattern. Now from here, you could build upon this code to produce your own version of the 10PRINT pattern, by altering some of the parameters of the sketch, such as; the spacing, the colour and possibly more interestingly the probability. A global float type variable has been included in the code above so that we can control the probability weighting for either a back or forward slash, try altering the value of ‘probability‘ between (‘0.01 and 0.99‘) to see how it will dramatically alter the resulting pattern. Alternatively you could trying altering the fundamental code by drawing a shape, such as, a rectangle with the size equal to ‘spacing‘.
However, before we progress, it would be useful to improve this code by using ‘translate‘, and ‘pushMatrix‘ and ‘popMatrix‘ and whilst we are at it include a function ‘drawSlash()’, which does the logic and drawing of the slash. This will all be handy if you wanted to extend or adapt this code:
int x = 0;                // Declare an integer type to keep track of the x position and assign it 0
int y = 0;                // Declare an integer type to keep track of the y position and assign it 0
int spacing = 20;         // Declare an integer type to determine the size (spacing) of the characters
float probability = 0.5;  // Set probability %

void setup() {
  size(400, 400);
  frameRate(60);
  background(0);
}

void draw() {
  drawSlash();                               // Call our function which determines and draws either a \ or a /
  x+=spacing;                                // Increment our x coordinate by spacing every frame
  overflow();                                // Check if the row has reached the right edge of the canvas
}

void drawSlash() {
  strokeWeight(2);
  stroke(255);                               // Set the stroke (outline) to white
  pushMatrix();                              // Store the global coordinate frame, and create a local (child) coordinate frame
    translate(x,y);                          // Translate the local frame to new position based on x and y
    if (random(1) < probability) {           // If random float is less than probability draw a \ if greater than probability draw a /
      line(0, 0, 0 + spacing, 0 + spacing);  // Draw a forward-slash \ (from {0,0} to {0+spacing,0+spacing})
    } else {
      line(0, 0 + spacing, 0 + spacing, 0);  // Call line to draw a backwards-slash / (from {0,0+spacing} to {0+spacing,0})
    }
  popMatrix();                               // Release the local coordinate frame and restore the global coordinate frame, ready for the next character
}

void overflow() {
  if (x > width) {                           // If current line is at end of canvas' width
    x = 0;                                   // Rest x to 0
    y+=spacing;                              // Increase y by spacing
  }
}
4. User Interaction
Lesson four will show how to use an event loop to start and stop boxes rotating according to mouse clicks or key presses.
Key programming concepts:
Events.
4.1 Introduction
Whilst it is interesting to observe repetition, variation and movement around the screen, it would be more practical if we were able to interact with the computer, to respond to events from the outside word such as a key press, mouse movement or mouse click. (Its possible we could even use an event from another device, such as a pressure sensor, hear-rate monitor or a camera, through connecting an Arduino to our Processing sketch, however, this won’t be the focus here.
4.2 Responding To Keyboard And Mouse Events
Lets begin with a simple rotating rectangle, which we’ve adapted from the previous lesson:
int frame = 0;                             // Declare integer type GLOBAL variable and assign it the value 0

void setup() {
  rectMode(CENTER);                        // Set rectangle to draw from its centre
}

void draw() {
  background(39,40,34);                    // Redraw the background
  translate(width/2, height/2);            // Translate coordinate frame to canvas centre
  rotate(0.0175 * frame);                  // Rotate by 1 deg, each frame
  rect(0, 0, 20, 20);                      // Draw rect, with position at origin and a size of 20 pixels
  frame++;                                 // Increment our frame counting variable by 1
}
We now have our rotating square, lets have a look at how we can make it rotate only when we hold a key on the keyboard. To do this we can simply alter the draw function so that it only increments our ‘frame‘ variable if a key is pressed, as so:
‘keyPressed‘ is a native Processing global variable, similar to ‘frameCount‘. It is a ‘boolean’ type variable, thus its value is either ‘true’ or ‘false’. We could have written: if (keyPressed == true) to test if a key is pressed, however this would be tautological and in our effort to write concise code it is unnecessary to include ‘== true‘, as ‘if’ has this condition as part of its inherit nature.
It possible to construct the opposite, a box that rotates by default, and stops while a key is pressed by changing the ‘if‘ condition, using a ‘not‘ operator, thus telling Processing that when ‘keyPressed’ is false rotate the box. See if you can make this happen using only the written instructions above, no example code is provided!
The use of the ‘not‘ operator alters the ‘if‘ phrase to read as ‘if not keypressed then increment frame’. Thus when no key is pressed we execute the code to increase the ‘frame‘ variable and when a key is pressed this code is skipped.
We can achieve the same functionality using a mouse press by replacing ‘keyPressed’ with ‘mousePressed’, as shown bellow:
Whilst this is useful, more often than not it is more desirable to stop the box using a single click, and restart the box when clicked a second time. Think of this like a switch, this is helpful when determining how to make this happen in code. A switch has two states, ‘on and off‘, which could be represented as ‘true and false‘. Therefore, we need to declare a new global ‘state’ variable which we can name ‘spinning‘. Thus if ‘spinning‘ is true, then I will execute the code to spin the box and vice versa. Using a separate state variable for control of movement (or other properties, such as colour) is an extremely common technique in programming, and one with which it is essential to become familiar with. Bellow is an example on how we can use a state variable:
int frame = 0;                             // Declare integer type GLOBAL variable and assign it the value 0
boolean spinning = true;                   // Declare boolean type GLOBAL variable and assign it true

void setup() {
  rectMode(CENTER);                        // Set rectangle to draw from its centre
}

void draw() {
  background(39,40,34);                    // Redraw the background
  translate(width/2, height/2);            // Translate coordinate frame to canvas centre
  rotate(0.0175 * frame);                  // Rotate by 1 deg, each frame
  rect(0, 0, 20, 20);                      // Draw rect, with position at origin and a size of 20 pixels
  if (spinning) {                          // If 'spinning' is true continue
    frame++;                               // Increment our frame counting variable by 1
  }
}
The above code will result in a permanently spinning square, as we have set our state variable ‘spinning‘ to true and at no point do we change it. This is not very useful, unless we provide a method to change the value of ‘spinning‘. To do this we need to include anther if statement inside of ‘draw‘ which ‘listens’ for when the mouse is pressed and inverses the value of ‘spinning‘, as follows:
  if (mousePressed) {                      // If the mouse is pressed continue
    spinning = !spinning;                  // Set spinning equal to the inverse of spinning's existing value
  }
The mouse press now controls the state variable by using ‘spinning = !spinning‘, see line 2 (that is, assign the value of spinning to ‘not’ the value of spinning, in other words set spinning to the inverse of its existing value: if spinning is true set spinning to false, and vice versa). The box, in turn, is controlled by the value of the state variable, so there is a two-step relationship between us, the user, who controls the variable, and the variable, which controls the box.
However, when you run this code you’ve probably noticed that when you click on the canvas it is not particularly effective. Sometimes it does not stop the box spinning, sometimes it does. Why is this? This is not entirely your fault, but more to do with the nature of using ‘mousePressed‘ within the ‘draw‘ function, as if the user keeps the mouse pressed just long enough, between calls to the ‘draw‘ function by the Processing engine, the next time intro ‘draw‘ the value of ‘mousePressed‘ is checked again and, it is still pressed, the value of ‘spinning‘ is inverted. Since ‘draw‘ is happening 60 times per second, and each click of the mouse will result in the mouse being pressed for a slightly different duration, we cannot be sure if our finger stayed on the mouse for only a single frame or more, therefore inverting ‘spinning‘ once, twice or even multiple times.
In order to make this more reliable, rather than use the ‘mousePressed‘ variable, we can move the state control to a special function, like the ‘setup‘ and ‘draw‘ function, which is called ‘mousePressed‘ (it shares the name of the variable). Note how the code for the spinning control is essentially extracted from within ‘draw‘ to the new function:
This sort of function is called an ‘event handler‘. Processing only calls an event handler function when an event occurs. In this case, the event is the mouse being pressed down, not during the time it is pressed, and so it is only called once, each time the mouse is pressed — making it much more reliable to control the box!
4.3 Control By Clicking On An Object
It is often the case that we want the box to stop rotating when we click on it, rather than just when we click on the canvas somewhere. To handle this event we can apply several methods. One simple and effective method is to select the colour of the pixel where the mouse is clicked. Since the box is white, if the pixel the mouse is pointing to is white, then we know to stop the box.
This method has a glaring caveat which is if we have more than one spinning white box. Which one has the user clicked on? To solve this we could opt to use method two: distance testing. We simply measure the distance from the centre of the box to the outside of (roughly), and see if the mouse click has occurred within this radius. However, although this method is better for multiple objects it too breaks down if we try use it in three dimensions.
The following sections will demonstrate the two methods we described above.
4.3.1 Method one: pixel colour
Before we can find pixel colour, I need to introduce a new sort of function, a function that interrogates the system, to find out, or calculate some value. So far our functions have been of the command type: draw a box, or set a pixel, and so on. Recall just one of those, the ‘set‘ function from the beginning of lesson three, which sets a pixel to a certain colour, as so:
color magenta = color(255, 0, 255); // Declare a new variable called magenta as type color and assign it magenta
set(10,10,magenta); // Set the pixel at coordinates {10,10} to the colour magentaThe interrogatory function ‘get‘ does the opposite of ‘set‘. While ‘set‘ sets the colour of a pixel, ‘get‘ finds a value of a pixel and returns that value. It is used as so:
background(0); // Set background to black
color unknown; // Declare a new variable called unknown as type color
unknown = get(50,50); // Get the colour of the pixel at coordinates {50,50}
// Print the RGB values of the found colour
println("R:" + red(unknown) + " G:" +green(unknown) + " B:" + blue(unknown));It’s important to notice how we are assigning a value to the variable ‘unknown‘. Unlike before, we declare the variable ‘unknown‘ as a colour type, but we don’t assign it a value at the same time, see line 2. Rather, it is assigned the result of the get function. Since the value of the return is a colour, it is a bit difficult to find out exactly what it is. We can obtain the brightness component of the colour using another of these question-type functions, called ‘brightness‘. Other question-type functions for querying a colour exist such as ‘red‘, ‘blue‘, ‘green‘ and ‘alpha‘, which are listed under Creating & Reading on the Processing References page.
Brightness returns a floating point number, like this:
background(0); // Set background to black
color unknown; // Declare a new variable called unknown as type color
unknown = get(50,50); // Get the colour of the pixel at coordinates {50,50}
float value; // Declare a new variable called value as type float
value = brightness(unknown); // Get the brightness of the colour unknown
// Print the brightness value of the found colour
println("Brightness: " + value);When you run the above sketch Processing will output in the console, the brightness value: Brightness: 0.0, when using grey-scale colours the brightness is equal to the colour value we assigned in the ‘background‘ function on line 1.
It’s relatively simple to extend this code to check for the pixel brightness at the x and y coordinates of the mouse location, as follows:
int frame = 0; // Declare integer type GLOBAL variable and assign it the value 0
boolean spinning = true; // Declare boolean type GLOBAL variable and assign it true
color unknown;
void setup() {
rectMode(CENTER); // Set rectangle to draw from its centre
}
void draw() {
background(39,40,34); // Redraw the background
translate(width/2, height/2); // Translate coordinate frame to canvas centre
rotate(0.0175 * frame); // Rotate by 1 deg, each frame
rect(0, 0, 20, 20); // Draw rect, with position at origin and a size of 20 pixels
if (spinning) { // If 'spinning' is true continue
frame++; // Increment our frame counting variable by 1
}
unknown = get(mouseX, mouseY); // Get the colour of the pixel at coordinates mouseX and mouseY
float value; // Declare a new variable called value as type float
value = brightness(unknown); // Get the brightness of the found colour stored in unknown
println("Brightness: " + value); // Print the brightness value of the found colour
}
void mousePressed() {                      // Special function used for 'listening' for a mouse press
  spinning = !spinning;                    // Set spinning equal to the inverse of spinning's existing value
}Note the use of two internal Processing variables mouseX and mouseY which we can use to get the x and y coordinate values for the mouse and when we query these values within the ‘draw‘ function, as we’ve done on line 17, we will get the mouse location every time draw runs. Thus, as we move the mouse across the canvas, the coordinate for the mouse is re-queried every 60 seconds. On line 20 we’ve told Processing to print the brightness of the pixel, which is at the mouse coordinates, to the console. Thus when you run this sketch and move the mouse over the spinning box you should see the value being printed to the console change to 255.0.
Now that we have the ability to check the colour of the pixel, we can use it to affect whether or not we change the spinning state variable. So when the mouse is clicked, only if the mouse is over the rectangle, that is, only if a white pixel is pointed to, will the state of the spinning variable switch, and the rectangle stop (or start) moving:
int frame = 0;                             // Declare integer type GLOBAL variable and assign it the value 0
boolean spinning = true;                   // Declare boolean type GLOBAL variable and assign it true

void setup() {
  rectMode(CENTER);                        // Set rectangle to draw from its centre
}

void draw() {
  background(39,40,34);                    // Redraw the background
  translate(width/2, height/2);            // Translate coordinate frame to canvas centre
  rotate(0.0175 * frame);                  // Rotate by 1 deg, each frame
  rect(0, 0, 20, 20);                      // Draw rect, with position at origin and a size of 20 pixels
  if (spinning) {                          // If 'spinning' is true continue
    frame++;                               // Increment our frame counting variable by 1
  }
}

void mousePressed() {                      // Special function used for 'listening' for a mouse press
  color unknown = get(mouseX, mouseY);     // Get the colour of the pixel at coordinates mouseX and mouseY and store it in the variable unknown
  if(unknown == color(255)){               // If the found colour is equal to the colour of the box (white)
    spinning = !spinning;                  // Set spinning equal to the inverse of spinning's existing value
  }
}
Before, we progress it’s important that you understand how this sketch works, and you’ve checked it does only start and stop when you click on the box. Pay attention to line 19 in which we have condensed some of the previous code into a single line in which we are declaring, and assigning our ‘unknown‘ colour type variable using the result of the ‘get‘ function. Lastly also make sure you understand the ‘if‘ statement on line 20 and how ‘unknow == color(255)‘ works!
4.3.2 Method two: distance testing
Pixel testing is all very well, but what happens if you have more than one of the same coloured objects? A more practical solution than using pixel colour is distance testing, which tests the bounding box, or bounding sphere or circle of the object. In two dimensions, this method is very simple. All we need to do is to calculate whether or not the mouse click occurred within a set proximity to the centre of the rotating box, this set proximity is usually calculated as a distance of less or equal to the radius of the object. To do so we are going to replace the code within the ‘mousePressed‘ function, in the last example, with the following:
The above code introduces a new native Processing function called ‘dist‘ which is a query type function which requires four parameters: dist(x1,y1,x2,y2) and will calculate the distance from the first provided point {x1,y1} to the second point {x2,y2} and returns this value as a float. In the above case, we are calculating the distance from the point at {mouseX,mouseY} and {width/2, height/2} (the centre of the canvas, which also happens to be the centre of the box!). If the distance is found to be ‘equal to or less than’ (‘<=‘) half the size of the box, then the mouse location must be inside the box. The fact that it is only a rough approximation to whether or not the click is inside the box does not particularly matter.
Try running the sketch, and you will notice that it is more usual to click towards the centre of the box than the very edge, though if you try on the edge it won’t stop spinning.
4.3.3 Improving the methods
Both of the methods described above need to be improved to cater either for similarly coloured objects or three dimensions. The improvements both work for all cases.
The pixel method can be improved as follows: we utilise the fact that Processing first draws the scene to something called the ‘back buffer’, that is an area which is not currently shown to the user. This mean Processing can go through all of its drawing operations, and only when it has completed everything, ‘swap the buffers’, so that what was shown before becomes the new ‘back buffer, and the old ‘back buffer’ is not shown to the user, we can use it to draw something in rough, and then draw something finally. The pixel method thus draws every object to be displayed in a different colour. if the mouse is pressed, we check the colour of the pixel, and change the state variables accordingly. Next, the scene is redrawn, this time using the actual colours for each object, before the buffers are swapped and the user sees the scene.
The distance method can be improved as follows: should you need it would be to project a vector from the mouse directly into the scene, in essence think of this as a ray which is perpendicular to the plane of the canvas. Following this, for each object in the scene, the inverse of the matrix that was applied to draw the geometry is applied to this vector (remember the construction of the matrix to draw the scene in lesson three). That is, all rotations, scales, and translations to draw the object where it is are ‘undone‘. These ‘undoing‘ operations are applied to the vector from the mouse. The result is a vector going in a strange direction, but all we need to do is perform a similar distance testing for the location {0,0,0} for the object we are testing for intersection. Does the vector pass close to {0,0,0}? If so, it has probably hit the geometry (the check is usually for whether the vector passes through a bounding sphere or a bounding box around the geometry). Depending on how thorough you are being, you may check details at this stage, but this becomes far more complex.
5. Introducing Classes (OOP)
Lesson five extends the rotating box code we wrote in lesson four, by making our box into a class (an object). We will refactor (clean up) the previous code by adding classes, thus allowing us to create new ‘truly independent’ rotating boxes with comparative ease.
Key programming concepts:
Events, classes, constructors, object oriented programming
5.1 Introduction
When writing code that draws things, which we can interact with, and we want to add more things which have different behaviours all the code might become a little complicated, so why not group certain bits of data and certain functions together, not as sketches, but as sub-sketches or more formally known as classes.
Java, and thus Processing, is often refereed to as an object-oriented-programming (oop) language and in the case of Java/Processing it uses a style of oop known as class-orientation. We can think of classes as the structure and behaviour of an object, or blueprint, of all objects of a specific type.
By using this method of programming for our rotating box sketch, we can create a blue print for what a box should look like, should it be a spinning box, or static, etc. And by doing this we can construct many unique boxes using a single line of code.
5.2 Multiple Spinning Boxes: A Case For Introducing Classes
Before we can write a single line of code to produce a box, and thus many boxes, it is necessary to make our existing code for rotating a box a little more generic. The problem with the current code is that if we want to move the box, we need to change the code in two places, both within the ‘translate‘ function and the ‘dist‘ function. To solve this we could instead use global variables for the position of the box (and perhaps the side length too):
int frame = 0;                      // Declare integer type GLOBAL variable and assign it the value 0
float posX = 0;                    // Declare float type GLOBAL variable for x-position of box
float posY = 0;                    // Declare float type GLOBAL variable for y-position of box
float side = 40;                    // Declare float type GLOBAL variable for size of box
boolean spinning = true;            // Declare boolean type GLOBAL variable and assign it true

void setup() {
  size(200,200);
  rectMode(CENTER);                 // Set rectangle to draw from its centre
}

void draw() {
  background(39,40,34);             // Redraw the background
  translate(posX, posY);            // Translate coordinate frame to canvas centre
  rotate(0.0175 * frame);           // Rotate by 1 deg, each frame
  rect(0, 0, side, side);           // Draw rect, with position at origin and a size of 20 pixels
  if (spinning) {                   // If 'spinning' is true continue
    frame++;                        // Increment our frame counting variable by 1
  }
}

void mousePressed() {                                   // Special function used for 'listening' for a mouse press
  if(dist(mouseX, mouseY, posX, posY) <= side/2){       // If the distance between the mouse and center is (less or equal) the radius
    spinning = !spinning;                               // Set spinning equal to the inverse of spinning's existing value
  }
}
Note that we cannot make these local variables, within ‘draw‘ or ‘setup‘, as they are required by both the ‘draw‘ function and ‘mousePressed‘ event handler, and, in addition, they are required to be maintained between calls to these functions by the Processing system. We would not usually write a sketch which makes use of so many global variables, if all we wanted to show was a single object as it would become rather difficult to keep track of everything. However, this is not a problem for us as we won’t be keeping the code in its present state and will soon move these variables inside a class.
If we wanted to introduce another spinning box at this stage, and wanted to control its spinning behaviour, we would have to have a whole new set of global variables for it: its centre position, its ‘spinning’ state, even its current frame. We would also need some functions: what to do when its ‘spinning’ state is true (advance its frame), drawing it, even what to do when the mouse is clicked on it. The code would quickly become messy, and that was just adding a second box. Therefore it’s best not to just add functions and data for each box all over the code, but to conceptualise a spinning box. We would ‘encapsulate’ some of the information that refers only to rotating boxes. Then we would be able to create ourselves an instance of the generic class of rotating boxes for each new box that we created. For example, have a large box rotating to the left side of the canvas, and a smaller box towards the middle, both with the same functionality.
In order to ‘encapsulate’ the information for a box, we can define a ‘class’ of ‘Box’ as follows. Firstly, create a new tab (you might like to call it ‘box’ or ‘mybox’). Secondly, copy and paste all the code we have created so far to the new tab. Note that this is copy, do not cut.
In the new tab, we shall encapsulate all of the code, and give it a name. The name is given by writing ‘class Box‘, and the encapsulation by enclosing all the code between braces ‘{‘ and ‘}‘, as follows:
class Box {

----COPIED CODE HERE!----

}
Now we need to remove the code which does not pertain specifically to the box. Note there are some subtle differences along the way:
class Box {

  // Class Variables
  int frame = 0;                     // Declare integer type GLOBAL variable and assign it the value 0
  float posX = 0;                    // Declare float type GLOBAL variable for x-position of box
  float posY = 0;                    // Declare float type GLOBAL variable for y-position of box
  float side = 40;                   // Declare float type GLOBAL variable for size of box
  boolean spinning = true;           // Declare boolean type GLOBAL variable and assign it true

  //Constructor
  Box() {
  }

  void draw() {
    pushMatrix();
      translate(posX, posY);          // Translate coordinate frame to posX and posY
      rotate(0.0175 * frame);         // Rotate by 1 deg, each frame
      rect(0, 0, side, side);         // Draw rect, with position at origin and a size of side
    popMatrix();
    if (spinning) {                   // If 'spinning' is true continue
      frame++;                        // Increment frame counting variable by 1
    }
  }

  void mousePressed() {                                   // Special function used for 'listening' for a mouse press
    if (dist(mouseX, mouseY, posX, posY) <= side/2) {     // If the distance between the mouse and posX, PosY is (less or equal) the radius
      spinning = !spinning;                               // Set spinning equal to the inverse of spinning's existing value
    }
  }
}
The ‘class‘ comprises some data (the original global variables we had: position, spinning state and frame). The ‘setup‘ function has been removed and replaced with a new function called ‘Box‘, yet the purpose of this function is actually very similar to that of ‘setup‘, in that it will be used to set up (construct) some initial conditions for a box. Note that the ‘rectMode‘ function has been removed, as this function is the default for all the boxes, not just one, and so remains as a generic item, not included within the box class. The draw class has changed only a little. The ‘background‘ function is gone, as like ‘rectMode‘, clearing the background is a generic function, applied before drawing any geometry. In addition, the draw function has had the function ‘pushMatrix‘ and ‘popMatrix‘ added. These will ensure that drawing this particular box will not affect the locations of any other boxes we may choose to draw. Before, when using ‘translate‘, it affected the global coordinate frame, now each box will have its own unique local coordinate frame. The ‘mousePressed‘ function remains the same. Collectively, this information is all to do with drawing and controlling rotating boxes, and forms the ‘Box‘ class (think of this as the blueprint for drawing a box).
The second half of the conceptualisation procedure is to include all the generic functionality within the main sketch tab. Switch back to the main tab, and edit the code until this is all you have remaining:
void setup() {
  size(400, 400);
  rectMode(CENTER);           // Set rectangle to draw from its centre
}

void draw() {
  background(39, 40, 34);     // Redraw the background
}

void mousePressed() {         // Special function used for 'listening' for a mouse press

}
Notice that I’ve kept all three functions in place, even though each now does very little: setup remains as before with the ‘rectMode‘ call, ‘draw‘ clears the background, and ‘mousePressed‘ presently does nothing at all.
You should try running this program at this point. It should do nothing, as might be expected, as the ‘Box‘ class is never used. It just sits there as a bit of generic code. However, once we have the class, we can create a new global variable, an instance of the box class, called ‘box1‘ as follows:
Box box1 = new Box();

void setup() {
  size(400, 400);
  rectMode(CENTER);           // Set rectangle to draw from its centre
}

void draw() {
  background(39, 40, 34);     // Redraw the background
}

void mousePressed() {         // Special function used for 'listening' for a mouse press

}
Lets take a look at the syntax; I have a variable called ‘box1‘ which is a ‘Box‘ type, and I immediately assign it the value of a new ‘Box()’. Notice that although we have created an instance of the box class, the sketch still does nothing, as there is no usage made of the instance. It simply sits there as a global variable. Once we have made an instance of the Box class, we can access the functions and variables for the particular instance using the following format: box1.variable, for example: box1.posX or box1.frame, and even: box1.draw().
We can implement the box as before like this:
void draw() {
  background(39, 40, 34);     // Redraw the background
  box1.draw();
}

void mousePressed() {         // Special function used for 'listening' for a mouse press
  box1.mousePressed();
}
Notice the syntax of each call: box1.something(). What happens in this code is that a global instance of the box is created: all the code that we wrote for the box is made into a new box, just like we created integer ‘containers‘ before and put integers into them. Needless to say, the Box container is significantly bigger than the integer container. It contains all the information and functions necessary to create a box. So, when it is created, all the variables for ‘box1‘ are set up, by the constructor function in the Box class. The side, spinning and so on are all set. Then, in the ‘draw‘ function, the code leaps to the Box container, and applies the function for that particular instance of the Box class.
To see this in operation, we can create a further instance of the box class, ‘box2‘, using the following lines:
Box box2 = new Box();
box2.draw();
box2.mousePressed();
Once these lines have been added and we run the sketch, you will see that both boxes are superimposed on top of one another (or perhaps you will not!), so you cannot separate the boxes.
However, we can separate them like this: we can move one of the boxes after we have created it. We can do that in the main ‘setup‘ function, so that it is only moved once. We might also like to change the side length too:
  box1.posX = 70;             // Set box1's posX to a new value 70
  box1.side = 10;             // Set box1's side to a new value 10
Check that you understand how this sketch works. Only ‘box1‘ is moved to the right and only ‘box1‘ has its side length reduced. In addition, note that the functions are independent of each other. ‘box1.draw()‘ is not the same as ‘box2.draw()‘. Each involves going to a different Box container, and drawing the box according to the variables (data) within that container.
As a final touch, I would like to change the way we create a box slightly. As you might imagine, if you have lots of boxes, it gets slightly cumbersome to set each one’s location and side length by using the syntax: box.posX = 50, or whatever it happens to be. A far more elegant method is to set up boxes with initial values of position and side length. We can do this by making use of the function we left empty earlier, the ‘Box()‘ function, the constructor.
If we return to the Box class tab, we can rewrite the declarations of the global variables and the constructor, like so:
/*
    * Learning Processing 3 - Lesson 5: Introducing Classes
  *
  * Description: Basic example of implementing a class within Processing
  *
  * © Jeremy Paton (2018)
  */

 //Objects/Classe
 Box box1, box2;

 void setup() {
   size(400, 400);
   rectMode(CENTER);                             // Set rectangle to draw from its centre
   box1 = new Box(width/2, height/2, 20);        // Constuct box1 with parameters (posX, posY, size)
   box2 = new Box(width/2+50, height/2-50, 60);  // Constuct box2 with parameters (posX, posY, size)
 }

 void draw() {
   background(39, 40, 34);                       // Redraw the background
   box1.draw();                                  // Draw box1
   box2.draw();                                  // Draw box2
 }

 void mousePressed() {                           // Special function used for 'listening' for a mouse press
   box1.mousePressed();                          // Call box1's mousePressed function
   box2.mousePressed();                          // Call box1's mousePressed function
 }
/*
* Class: a Box (litterlly just a box!)
*
* Description: Above ^
*
* @param {int} frame - increasing counter based on frameRate();
* @param {float} posX - x coordiante for the center of the rectangle
* @param {float} posY - y coordiante for the center of the rectangle
* @param {float} side - size of the box
* @param {boolean} spinning - on/off toggle
*/
class Box {
// Class Variables
int frame = 0; // Declare integer type GLOBAL variable and assign it the value 0
float posX; // Declare float type GLOBAL variable for x-position of box
float posY; // Declare float type GLOBAL variable for y-position of box
float side; // Declare float type GLOBAL variable for size of box
boolean spinning = true; // Declare boolean type GLOBAL variable and assign it true
//Constructor
Box(float x, float y, float s) {
posX = x; // Set posX equal to the parameter x
posY = y; // Set posY equal to the parameter y
side = s; // Set side equal to the parameter s
}
void draw() {
pushMatrix(); // Save global coordinate frame
translate(posX, posY); // Translate coordinate frame to posX and posY
rotate(0.05 * frame); // Rotate by x deg, each frame
rect(0, 0, side, side); // Draw rect, with position at origin and a size of side
popMatrix(); // Restore global coordinate frame
if (spinning) { // If 'spinning' is true continue
frame++; // Increment our frame counting variable by 1
}
}
void mousePressed() { // Special function used for 'listening' for a mouse press
if (dist(mouseX, mouseY, posX, posY) <= side/2) { // If the distance between the mouse and center is (less or equal) the radius
spinning = !spinning; // Set spinning equal to the inverse of spinning's existing value
}
}
}The constructor, see lines 23 – 26 on the Box class tab, now operates like a function which requires parameters, in this case the following three parameters are: ‘x‘, ‘y‘, ‘s‘, which are passed to the ‘Box’ function and then we assign the values stored by these parameters to the variables within our an instance of our Box class.
When we declare a box, see line 10 on the Main code tab, we don’t assign it a new box instance. This has been moved to within the ‘setup‘ function and now the constructor ‘Box‘ function within the Box class is used much like we use ‘int(5)‘, to say we would like an integer with the value five, or ‘color(255,0,0)‘ to make the colour red. See lines 15 and 16 on the Main code tab where we assign ‘box1‘ and ‘box2‘ a new instance of Box each with their own parameters for: location and size.
Try clicking on either box above and you can see how they independently operate.